NSIS Cloud
NSIS Cloud is an application that allows users to view and manage system resources stored in the resource repository. Specific resources in the repository include:
Map applications defined and shared by users using the map application creator.
Spatial, tabular, raster, and algorithmic data deposited and shared by users in the resource repository.
External services and map compositions defined and shared by users using the map composition creator.
Complex and elementary analyses.
1. Application features
This section describes specific NSIS Cloud features that are available only to logged-in users. Application functionalities, descriptions, and system images were created from the external user level. Depending on the assigned role, the user may have a different level of system access.
2. Launching the application
The NSIS Cloud application is launched from the portal’s home page. To start the NSIS Cloud application, the user first clicks the “NSIS Cloud” button ( ).
).
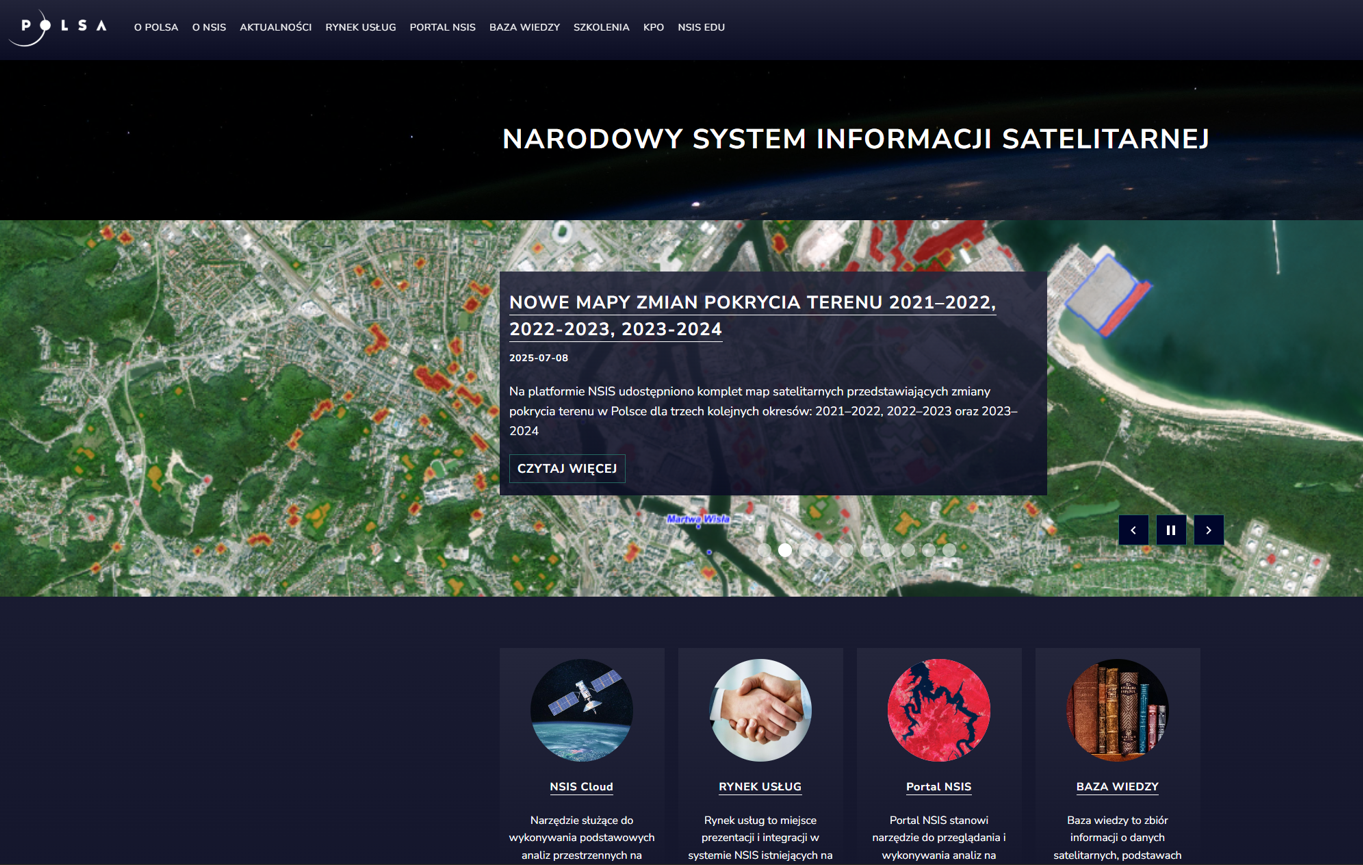
Fig. 1. Starting the application from the main page of the portal
This opens the “Service Market” application window, where you need to click the “Log in” button ( ) in the top menu of the application.
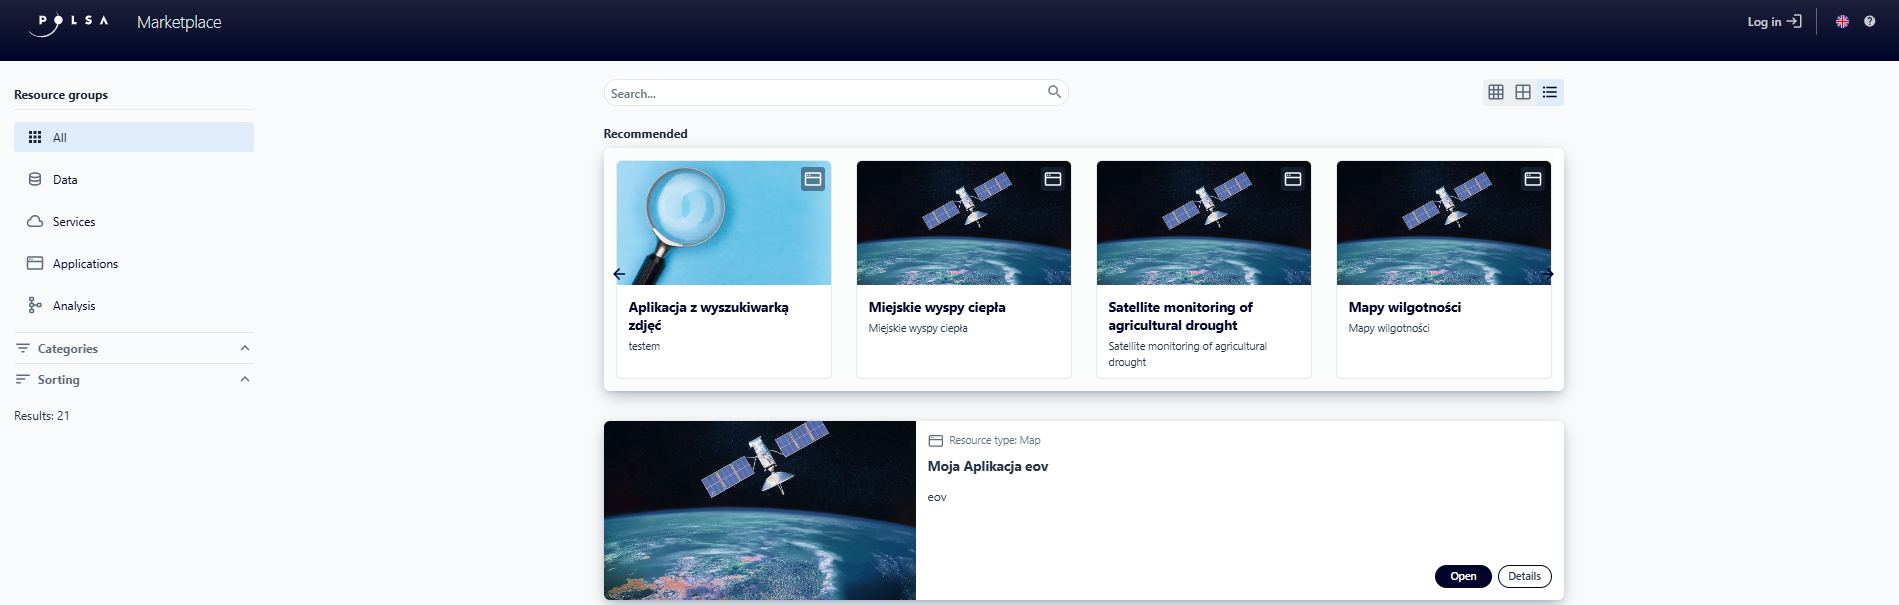
Fig. 2. The “Service Market” application window
The login window appears in the browser.
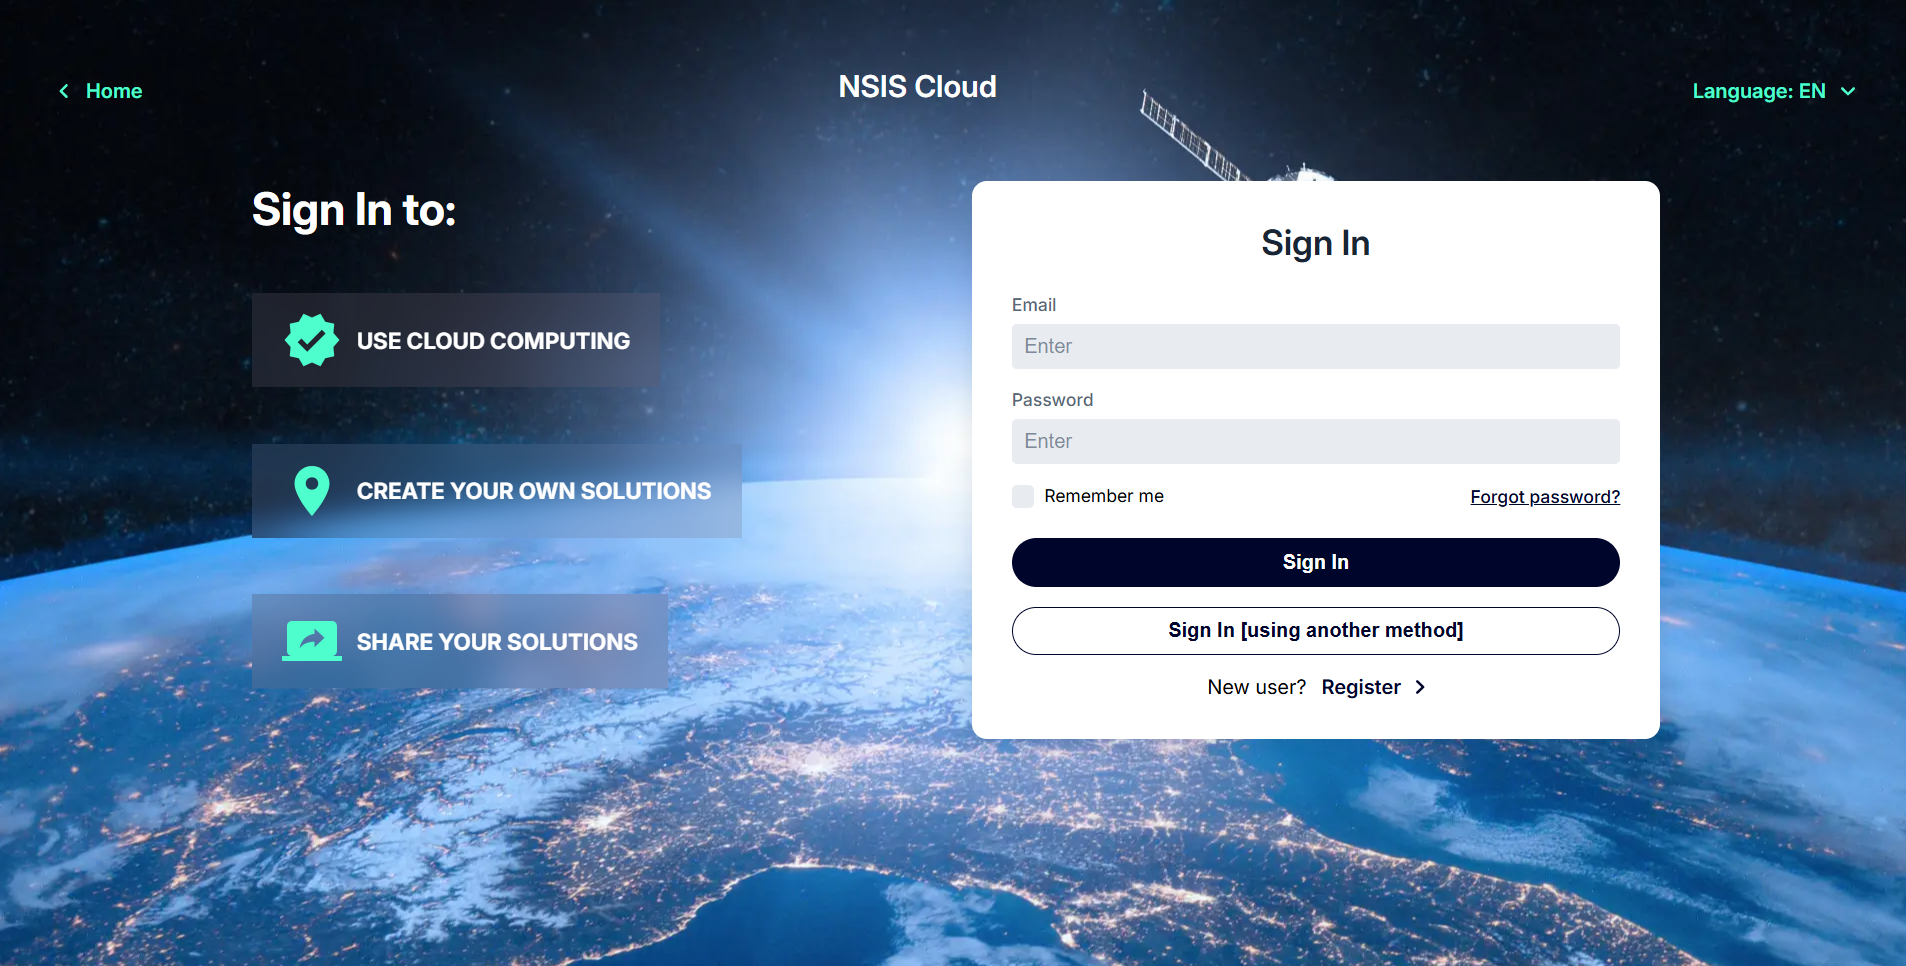
Fig. 3. Login window
3. Login to the application
Launching NSIS Cloud requires the user to register and log in.
The user completes the required fields in the registration form (marked with an asterisk  ) and then selects the “Register” button. After completing the registration process, the user receives an email confirming the account creation and further registration steps.
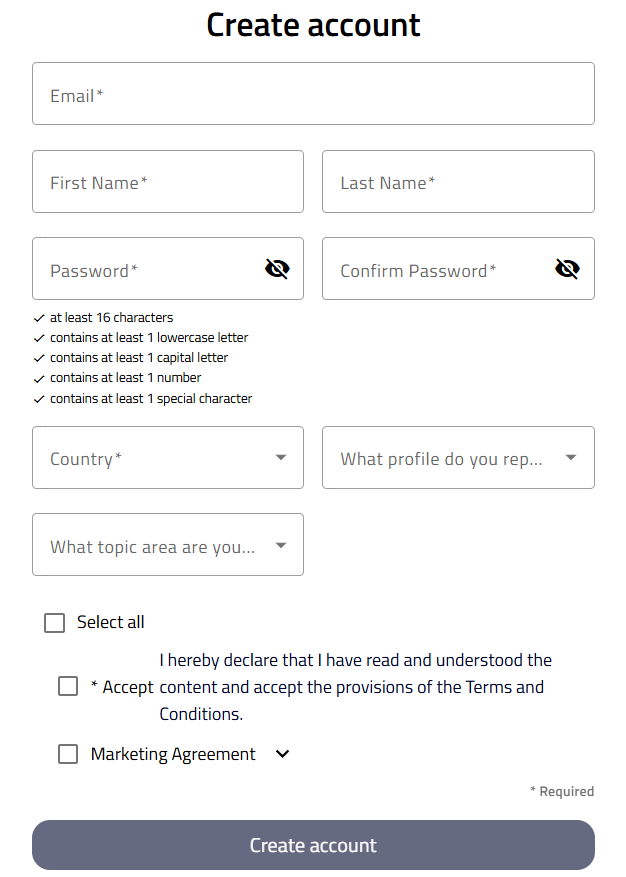
Fig. 4. Registration form
After successfully completing the registration steps, the user can log in to the NSIS Cloud application. They enter their login details and then confirm their registration by clicking the “Log in” button ( ).
).
4. Presenting, filtering and searching resources
After logging in to the application, a list of resources will be displayed in the main window. The list includes a thumbnail of the resource, the resource name, and basic information about the resource (for example creation date, update date). The list can be filtered based on resource type and availability.
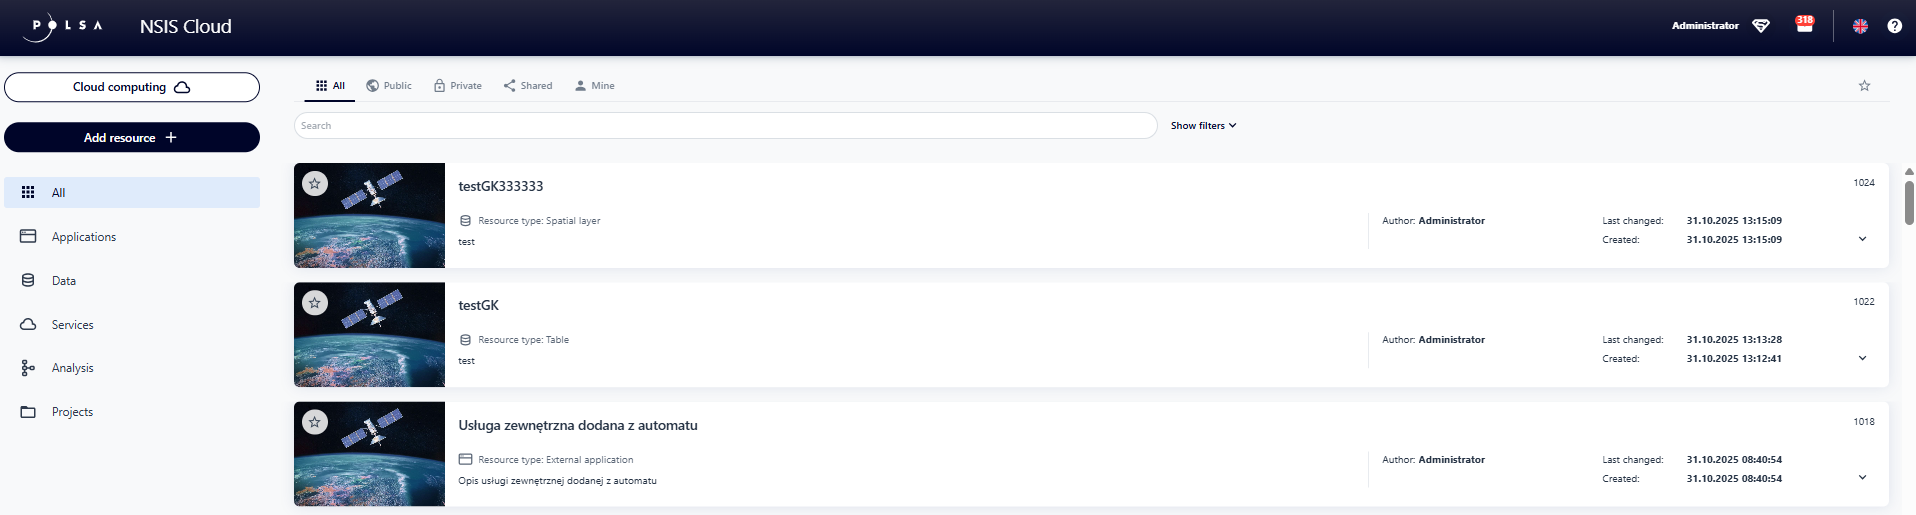
Fig. 5. Window with the list of resources
A text-based resource search option is available. To search for a resource, the user enters a criterion (either the resource name or number) by which the user wish to search. The application automatically filters the list of resources according to the specified criterion.

Fig. 6. Searching for resources
To clear a search criterion, the user selects the “x” ( ) sign. The application displays the full list of resources.
The user can filter resources using the options available next to the search field. To use filters, the user selects the “Show filters” button ( ).
).

Fig. 7. Filtering window
The items in the “Resource Type” list depend on the resource filter activated in the left sidebar. If the “Data” display option is selected, only items related to that data will be included in the “Resource Type” list.
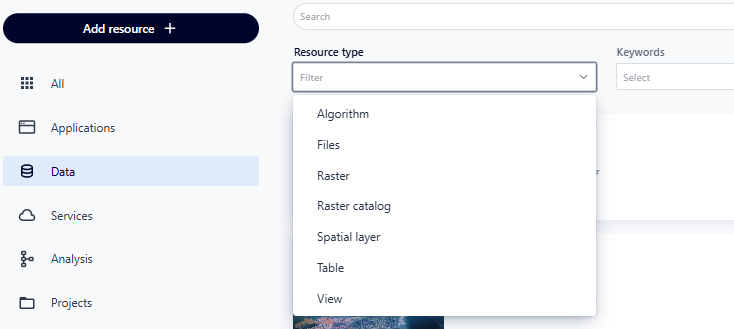
Fig. 8. Types of resources
The user can also filter resources by “Resource Availability” and “Keywords”. From the top filtering panel, the user has access to resource sorting options. After expanding the “Sorting” list, the user can select the category by which the resources are listed. The icon ( ) allows the user to change the sorting direction, while the button marked with an asterisk (
 ) allows the user to display resources previously marked as favorites.
The application also allows the user to filter resources by type. Using the left-side menu, the user can select five basic resource types: “Applications”, “Data”, “Services”, “Analysis”, and “Projects”.
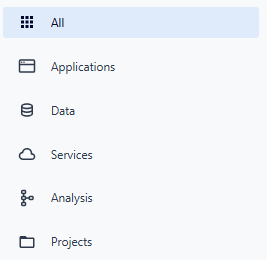
Fig. 9. Resource categories
When the user selects “All”, all resource types are displayed on the home page.
Each resource group is divided into the following categories:
“All” – displays all resource categories.
“Public” – published resources available to every user and team.
“Shared” – resources shared with the user by another user or team.
“My” – resources created by the user.

Fig. 10. Resource criteria
If the user switches profile to the team context, the resources of the selected team will be filtered in a similar manner to the user’s resources.
“All” – displays all resource categories.
“Public” – published resources available to every user and team.
“My” – resources created by the team or transferred to the team.
5. Presentation of individual resources
A detailed description of a resource (for all resource types) can be displayed using the button ( ) at the bottom of each resource list item. For a specific resource, the user can display specific functions by selecting the context menu button (
 ).
).
The user can add a resource to favorites. To do this, the user selects the button marked with an asterisk in the upper corner of the graphic representing the resource ( ).
).
Fig. 11. Adding a resource to favorites
The actions available for resources, described in the following sections, are presented from the perspective of the user who owns the resource. This user has full access to all operations possible on the given resource. The range of available actions and resource types may vary depending on the permissions assigned to the user.
Description and actions for the Applications Resource
The “Applications” resource includes the following types:
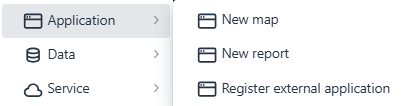
Fig. 12. Applications – resources
“Map” – a map application containing added spatial layers and defined widgets,
“External Application” – a link to an application running in another system, integrated with the “NSIS Cloud” platform, via a defined URL address.
The context menu window displays the actions available for the resource type. For the “Applications” resource, the following actions are available: “Open”, “Properties”, “Delete”, “Edit”, and “Duplicate”.
Action Description:
“Open” – After selecting this option, the application is displayed in a new browser tab.
“Properties” – This option allows the user to edit/view metadata and assign permissions to the resource.
“Delete” – This option allows the user to delete the resource from the repository.
“Edit” – This option is available for “Maps”. Selecting this option will open the application in the Map Application Studio and allow the user to change its configuration.
“Duplicate” – This option is available for “Maps”. It allows the user to create a copy of the resource.
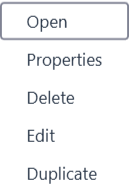
Fig. 13. Applications – available actions on resources
Description and actions for the Data Resource
The “Data” resource includes the following types:
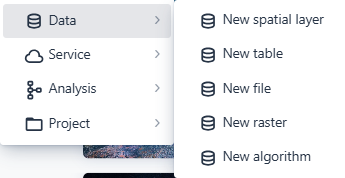
Fig. 14. Data – available resources
“Spatial Layer” – a layer attached to selected applications displaying spatial objects.
“Table” – a table containing data.
“Files” – any file imported into NSIS Cloud by the user, with a maximum size specified by the Administrator.
“Raster” – a raster file imported or registered in NSIS Cloud by the user, with a maximum size specified by the Administrator.
“Algorithm” – a definition of the remote sensing data analysis process, represented as an XML processing graph, generated in SNAP (Sentinel Application Platform); used to configure the process in the Task Studio application, available to logged-in users.
The following actions are available for the “Data” resource: “Download”, “Properties”, “Delete”, “Export”, “Edit”. The list of actions for the selected resource varies depending on the data subtype and the user’s permissions to the resource.
Action Description:
“Download” – this function will download the file to user computer’s local drive.
“Properties” – this function allows the user to edit/view metadata and assign permissions to the resource.
“Delete” – this function allows the user to remove the resource from the repository.
“Export” – after selecting this function, the user can export the spatial layer to geoJSON, shp, csv, kml formats, or the table to xlsx or csv formats. During export, you can also select the coordinate system for the resource and the type of column names.
“Edit” – selecting this function for the spatial layer/table will open the data editing window.
Description and actions for the Service Resource
The “Services” resource includes the following types:
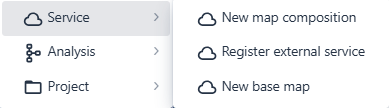
Fig. 15. Services – available resources
“Map Composition” - a composition created in Map Composition Studio, can be used when creating a map application in Map Studio,
“External Service” - a user-defined external WMS/WMTS/MapServer/GTFS/WFS service.
The following actions are available for the “Services” resource: “Properties”, “Edit”, “Delete”, and “Duplicate”. The list of actions for the selected resource varies depending on the service subtype and the user’s permissions for the resource.
Action description:
“Properties” - this function allows the user to edit/view metadata and assign permissions to the resource.
“Edit” - selecting this function will open: the Map Composition Studio for the Map Composition and the Edit Window for the External Service, where the user can edit the service and save changes.
“Delete” - this function allows the user to delete the resource from the repository.
“Duplicate” - this function allows the user to create a copy of the Map Composition resource.
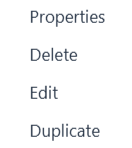
Fig. 16. Services – available actions on resources
Description and actions for the Analysis Resource
The “Analysis” resource includes the following types:
“New Complex Analysis” – used to create task models that, in addition to mathematical calculations, also perform operations on resources, such as rasters. A complex analysis can consist of Elementary Analysis, an Algorithm, or another Complex Analysis.
“Elementary Analysis” – a key component of Complex Analysis, consisting of geoprocessing. Used in the Task Studio. It can only be created by the Administrator.

Fig. 17. Analyses – available resources
The following actions are available for the “Complex Analysis” resource: “Run”, “Edit”, “Properties”, “Duplicate”, “Export”, and “Delete”.
Action Description:
“Run” – this function opens the Task Studio in a new browser tab, allowing the user to run the analysis.
“Edit” – this function opens the Task Studio in a new browser tab, allowing the user to edit the analysis.
“Properties” – this function allows the user to edit/view metadata and assign permissions to the resource.
“Duplicate” – this function allows the user to create a copy of the resource.
“Export” – this function saves the resource to the user’s local disk in JSON format.
“Delete” – this function allows the user to delete the resource from the repository.
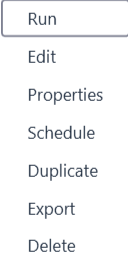
Fig. 18. Analyses – available actions on resources
The user cannot perform actions for the “Elementary Analysis” resource type. However, the user can use it to configure Complex Analysis in the “Task Studio” application.
Description and actions for the Projects Resource
The Project resource organizes resources in a folder format. The user can add any resources (for example those related thematically), even other projects, to a project. The following actions are available for the “Projects” resource: “Open”, “Properties”, and “Delete”. The list of actions for a selected resource varies depending on the user’s permissions for the resource.

Fig. 19. Project – available resources
Action Description:
“Open” - this action allows the user to open the project.
“Properties” - this action allows the user to edit/view metadata and assign permissions to the resource.
“Delete” - this action allows the user to remove the resource from the repository.
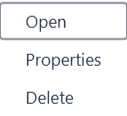
Fig. 20. Project – available actions on resources
6. Adding a new resource
From the side menu, after selecting the “Add Resource” button ( ), the user can select the specific resource to add from the drop-down list.
The “New Map” and “New Spatial Layer” items will be described in the descriptions for adding an “Application” and “Data”, respectively.
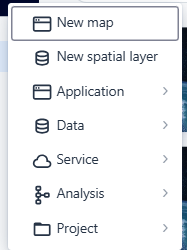
Fig. 21. List of resources to add
Adding an application
After hovering the cursor over the “Application” item, the user will see a list of available items to add.
Fig. 22. Application – list of resources
New Map
“New Map” – this functionality redirects the user to the Map Application Studio to prepare the map application. The functions are described in the documentation:
Register an External Application
“Register an External Application” - this functionality opens a window for adding an external application. In the “Resource Information” window, the user completes the required fields: “Title” and “Description”, and then enters the address in the “Application Address” field.
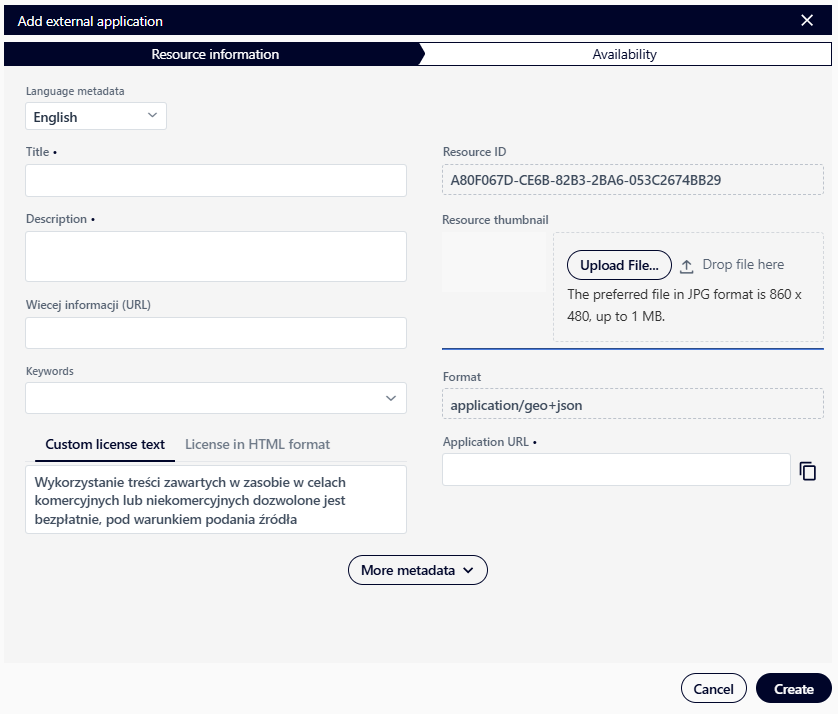
Fig. 23. Window for adding an external application
After selecting the “Create” button, the system creates a new external application and automatically proceeds to the “Availability” tab.
Here, the user can:
share the resource using the “Share” button,
submit a publication request by selecting the “Submit a Request” option.
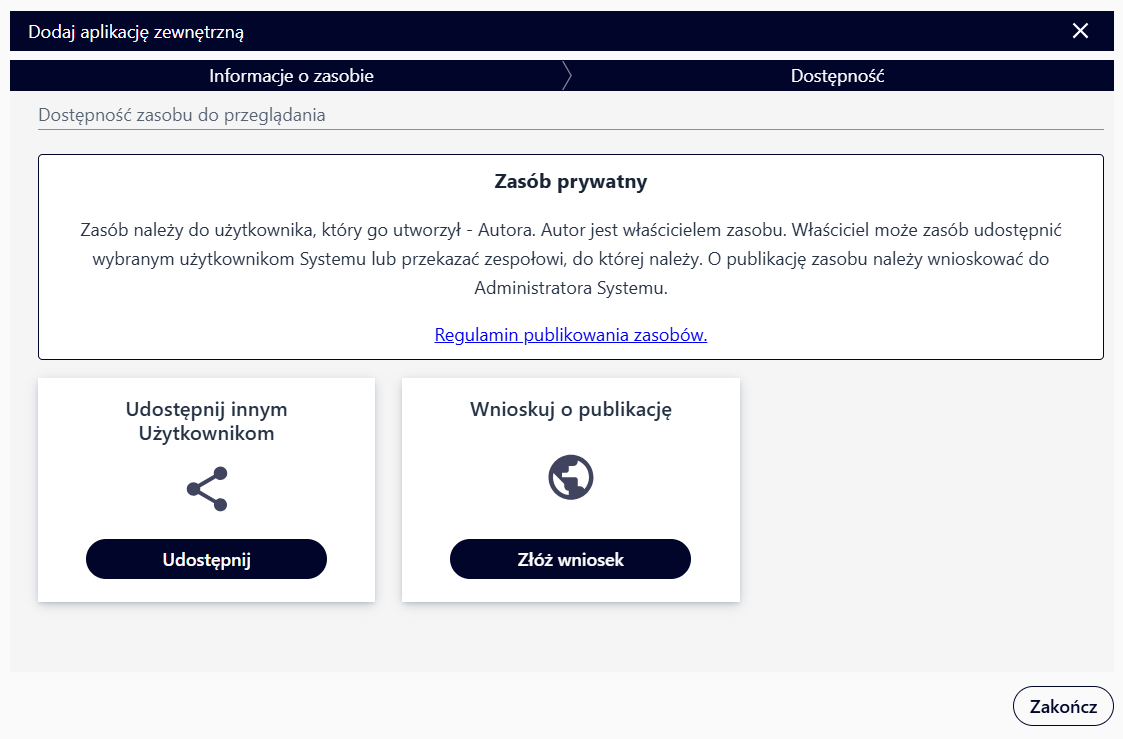
Fig. 24. Window for sharing an external application
Adding Data
After hovering over “Data”, the user will see a list of available items to add.
Fig. 25. List of resources to add
New Spatial Layer
“New Spatial Layer” – this functionality opens a window for adding a new spatial layer.
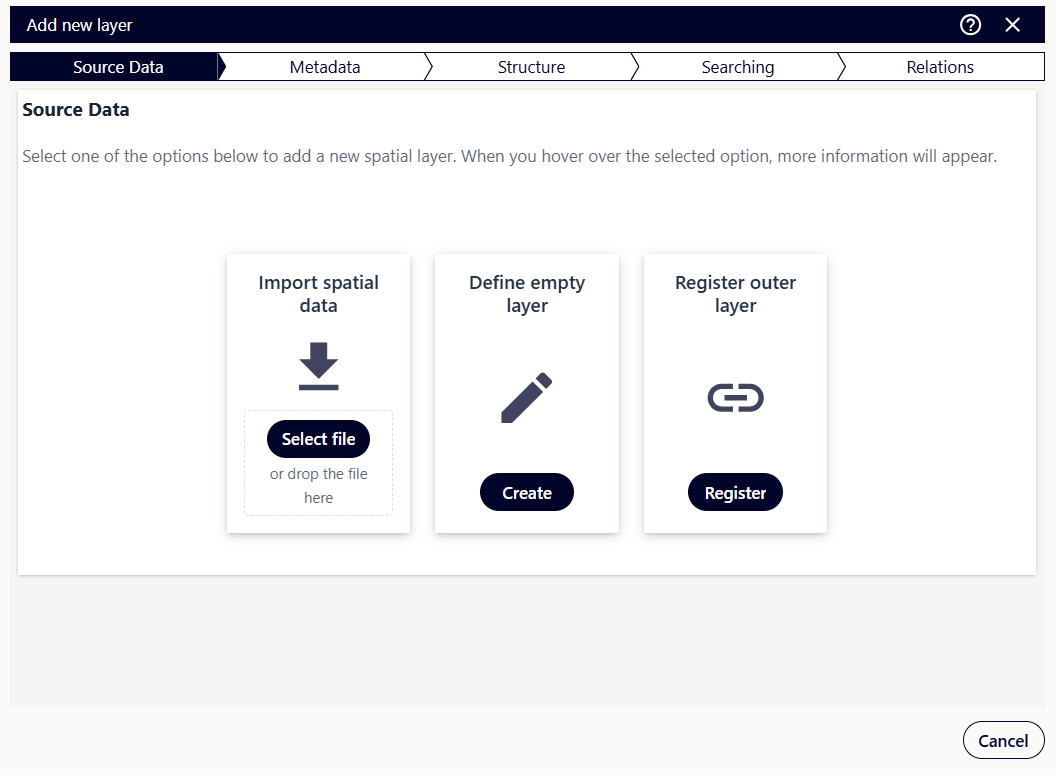
Fig. 26. Window for adding a new spatial layer
Adding a New Layer by Importing Data
The “Import Spatial Data” option creates a layer by importing spatial data. The user selects the “Choose File” ( ) button next to “Import Spatial Data”.
The following formats can be used as source data during import: GeoJSON, CSV (comma-separated fields, geometry in WKT format), SHP (ZIP package), KML (in WGS84), GML, GPX, and GPKG.
The imported data should:
have a header row with field names,
contain one geometry type (polygons, lines, or points),
not exceed 100 MB in size,
contain a maximum of 100,000 records, and have UTF-8 encoded characters.
When importing multipoint geometry, there will be significant limitations in the way the data is presented. The user specifies the file location (the user can also drag and drop the file). The next step is to complete the resource metadata. The user completes all mandatory fields and can also specify a thumbnail for the new resource by selecting the file with the thumbnail using the “Choose File” ( ) button or by dragging and dropping the file.
Next, the user expands the “Keywords” list and selects one of the options, or enters a new word in the edit field and presses the “Enter” button.
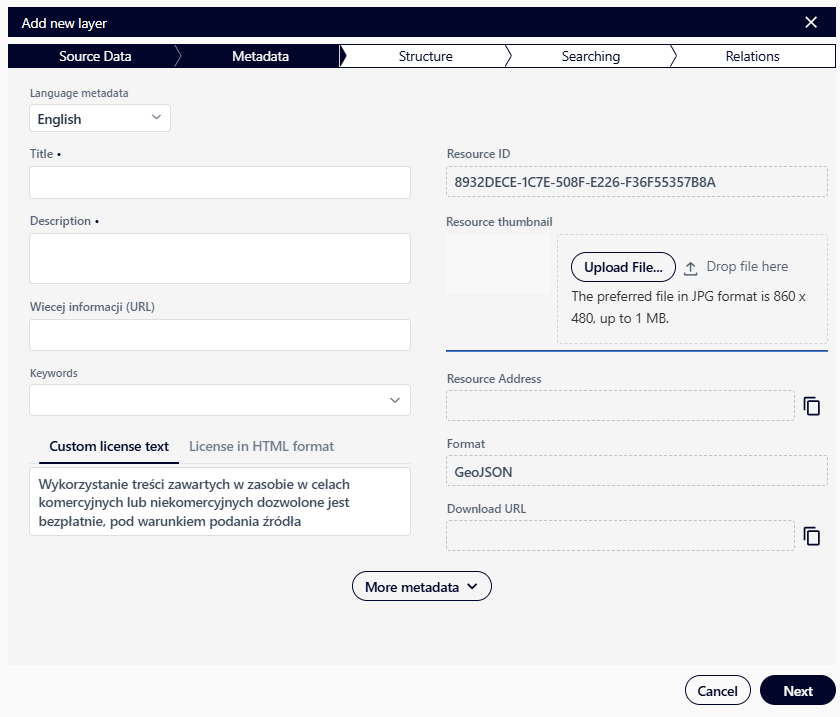
Fig. 27. Adding a spatial layer – Metadata window
After selecting the “Next” ( ) button, the application displays a window for defining the dataset structure.
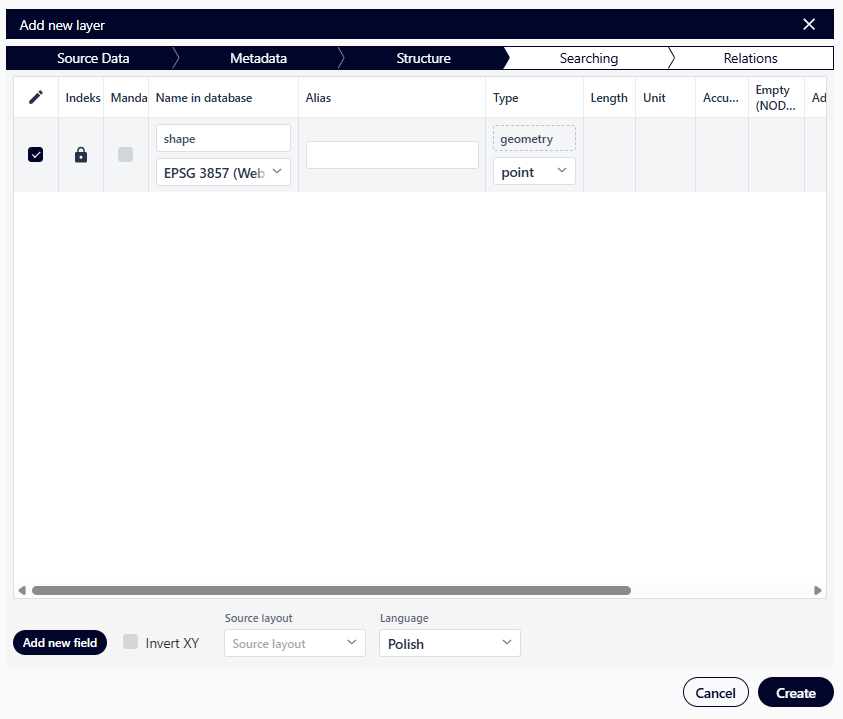
Fig. 28. Adding a spatial layer – Structure window
The user selects which fields will be imported into the database using the toggle buttons ( ) in the column marked with the symbol. Then, using the checkboxes in the column marked with the pencil (
 ), they determine whether the field will be editable. The “Index” column allows the user to select fields for indexing in the database, which can speed up SQL queries/database operations. The “Mandatory” column allows the user to specify whether fields must be completed when editing/adding data. The user can also define the “Name in the database”, the “Alias” (an alternative field name that is more user-friendly/understandable), and the “Type” of the field.
Field types available in the System:
string - stores a string of characters of a specified length (“Length” column). It can contain letters, numbers, and special characters. - clob (Character Large Object) - a data type used to store large amounts of text data (it can store a string of characters with a maximum size of 65,535 bytes).
guid (Globally Unique Identifier) - is a globally unique identifier. It is a number or string used to uniquely identify objects. Often used as a primary key value in tables.
date - is used to store dates. It stores information about the year, month, and day.
timestamp - is a data type that stores dates and times precisely. It is measured from a reference point, such as the beginning of the Unix epoch (January 1, 1970, 00:00:00 UTC). It typically contains information about the year, month, day, hour, minute, and second.
time - stores time information in the form of hours, minutes, and seconds. It does not include dates.
blob - (Binary Large Object): A BLOB is used to store binary data such as images, sounds, videos, etc.
json - stores data in the JSON (JavaScript Object Notation) format. JSON is a popular format for storing and exchanging data.
int - an integer data type that stores whole numbers (without a decimal part) in the range -2,147,483,648 to 2,147,483,647.
short - an integer data type with a smaller range than “int.” It stores integers in a shorter range than int; from -32,768 to 32,767.
long - an integer data type with a larger range than “int.” It stores integers in a larger range than int; from -9,223,372,036,854,775,808 to 9,223,372,036,854,775,807.
double - a floating-point data type that stores floating-point numbers with a larger precision than “float” (64 bits).
float - a floating-point data type that stores floating-point numbers with a smaller precision than “double” (32 bits).
bool - a logical data type that stores a logical value (true – “1”/false – “0”).
The user also can define:
Range - for a numeric field,
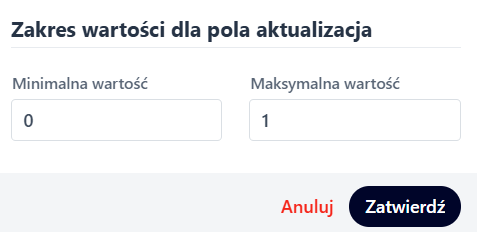
Fig. 29. Value range window
Allowable number of characters - for a text field,
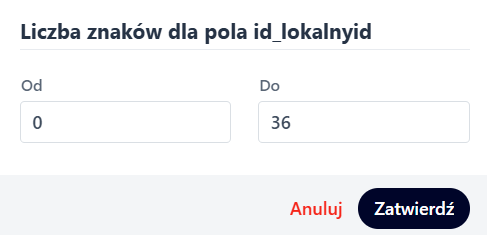
Fig. 30. Character count window
Dictionary
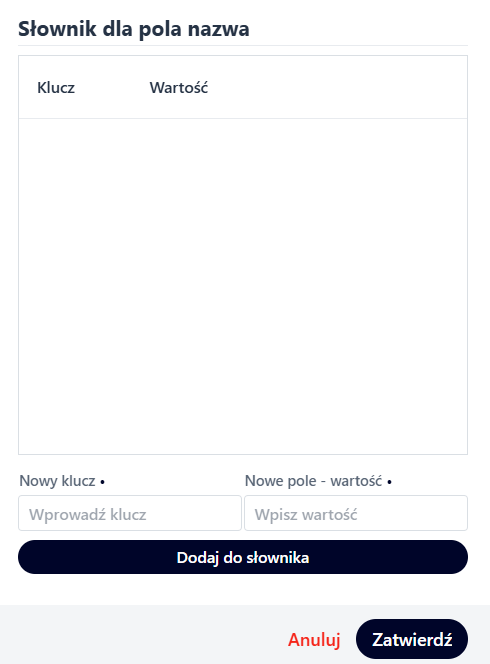
Fig. 31. Dictionary window
After defining the dataset structure, the user selects the “Create” ( ) button. The application displays a window for defining indexes for the loaded dataset. The user defines indexes by setting the strength for the selected attribute: “None”, “Weak”, “Strong”. Indexing is intended to define the fields by which objects will be searched in the map application. The name and description templates are used in the Map Application Studio. Templates do not necessarily have to include the field by which the system will search for objects.
To add an item to the name template, the user selects the button ( ) in the column “Add to name” or the same button in the column “Add to description” if they want to add the item to the description template. The operation is completed by pressing the button “Create template” (
 ). The name and description will be used in applications.

Fig. 32. Adding a new layer – Search window
The final, optional step in adding a layer is defining a relationship. Relationships are created to establish connections between different tables and layers in the database. Relationships apply to resources such as spatial layers or tables and are defined using a primary resource key and a resource key for the resource in the relationship. Relationships will be visible in the Map Application Studio. To define a resource in a relationship, select the “Add Relationship” button ( ) and then search for the target resource in the list.
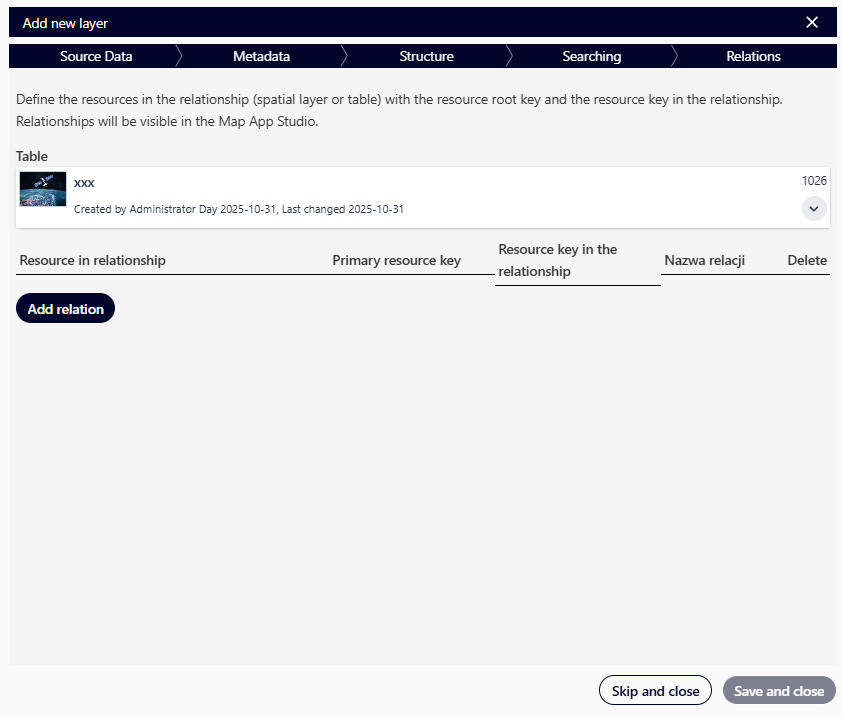
Fig. 33. Adding a new layer – Relations window
After selecting the resource, the user selects the field for which the relationship will be created. To do this, the user selects the fields that will uniquely identify the objects in the relationship from the “Primary Resource Key” and “Relationship Resource Key” lists. Additionally, the user can define a “Relationship Name”. The user can also create more than one relationship within a single resource.

Fig. 34. Adding a relation to a resource
If the user does not want to create a relationship at this level of resource definition, selects the “Skip and Finish” button ( ).
).
Adding a new layer by defining an empty layer
The “Define Empty Layer” option allows the user to create a new, empty spatial layer. This process is similar to the spatial data import operation. Selecting this option takes the user to the metadata form, as it doesn’t require specifying source data.
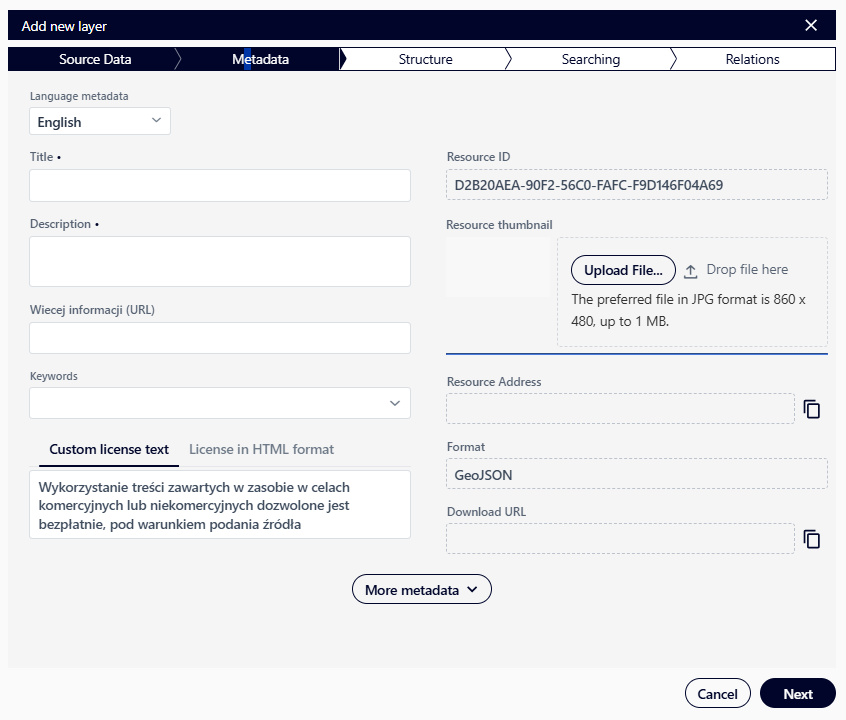
Fig. 35. Adding a spatial layer (empty layer)
Defining the complete structure of the new layer is done in the “Structure” tab by specifying the geometry type, selecting the coordinate system, and specifying field names and types.

Fig. 36. Adding a spatial layer (empty layer) – structure
The user starts by entering metadata describing the layer and then proceeds to the next step by clicking the “Next” button (). The next step is to define the layer structure by adding fields using the “Add new field” button ( ).
).
For each field, the following information must be specified:
Type – the field’s data type (for example text, number),
Alias – the name displayed in the interface,
Database Name – the technical name of the field in the database.
The user applies the “Create” button (). In the next window, the user defines the “Name Template”, “Description Template”, “Keywords” and “Indexes”.
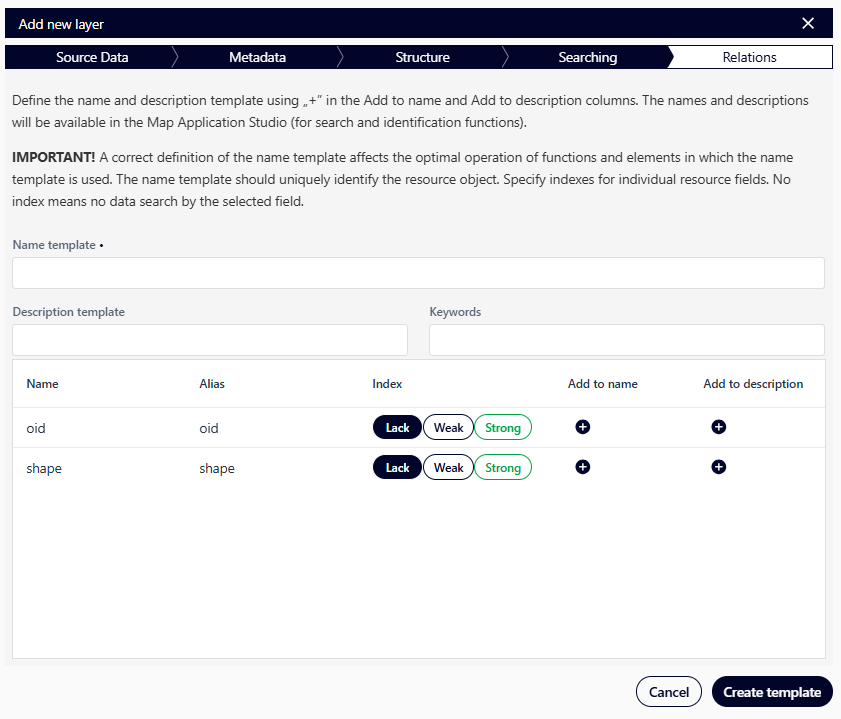
Fig. 37. Adding a spatial layer (empty layer) – search
The last optional step of adding a layer is defining a relation. Relations are created to establish connections between different tables and layers in the database. They apply to resources such as spatial layers or tables, and they are defined using the main resource key and the related resource key. Relations will be visible in the Map Studio application. To define a related resource, click the “Add relation” button (), and then search for the target resource in the list. The actions are performed in the same way as when creating a spatial layer by importing spatial data.
New Table
“New Table” - this functionality opens a window for adding a new table, where the user can create a table by importing data or define an empty table.
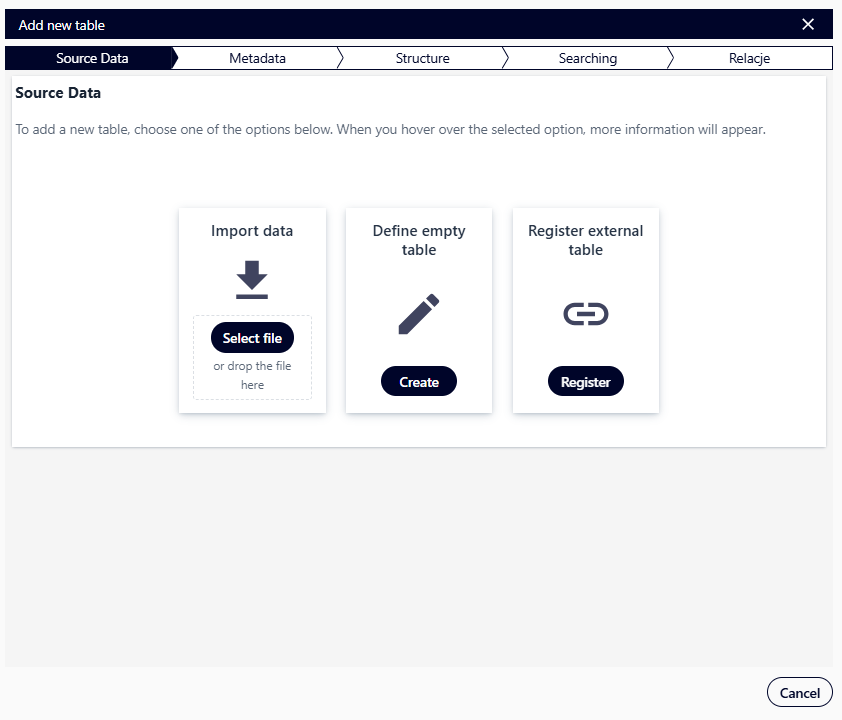
Fig. 38. Adding a new table
After selecting the “Import Data” option, the user selects the “Choose File” button (), then selects the data file from disk and fills out the Resource Metadata in the next window.
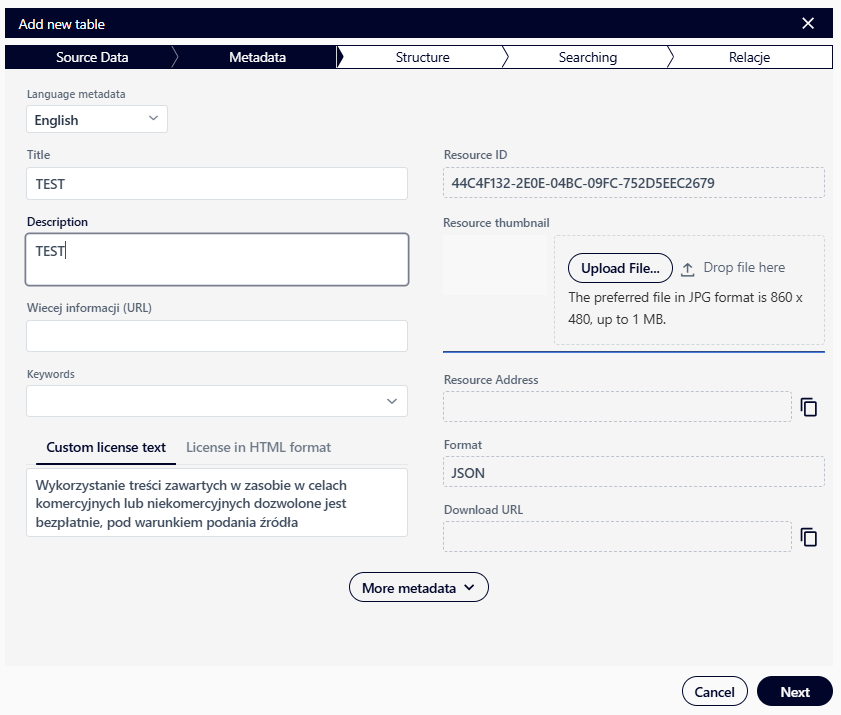
Fig. 39. Adding a new table – Metadata
In the next window, the user edits the structure and selected parameters and then selects the “Create” button ().
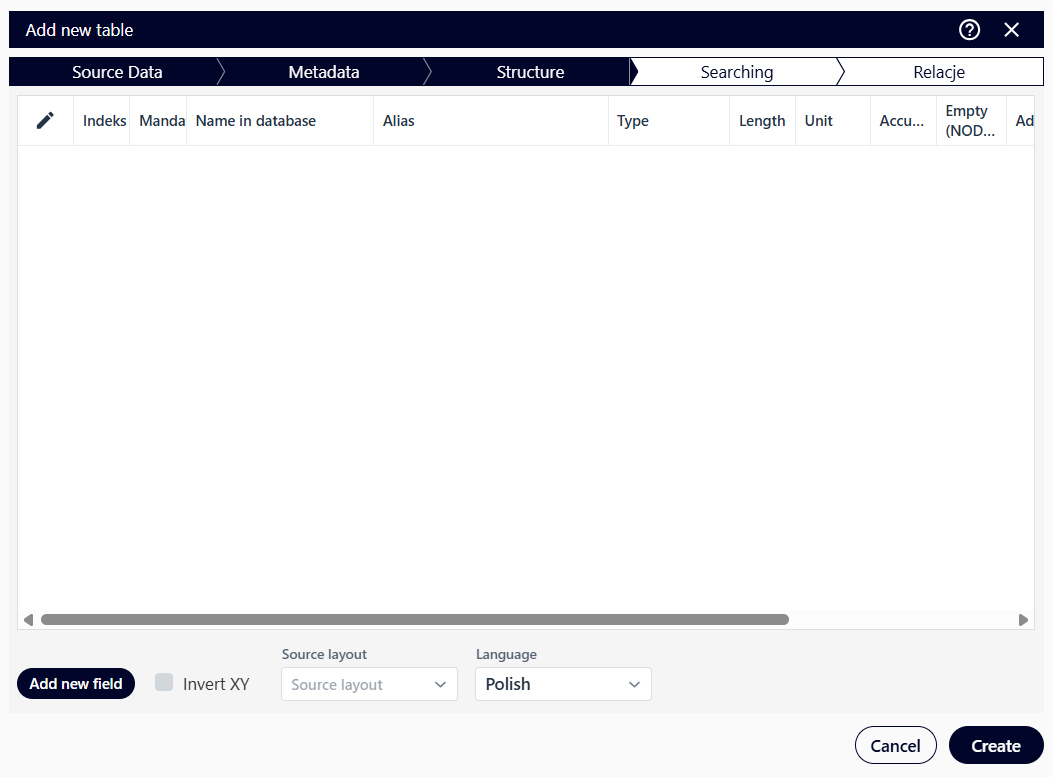
Fig. 40. Adding a new table – Structure
In the next “Search” window, the user fills in the required fields and clicks the “Create template” button (), which results in the correct creation of a new table.
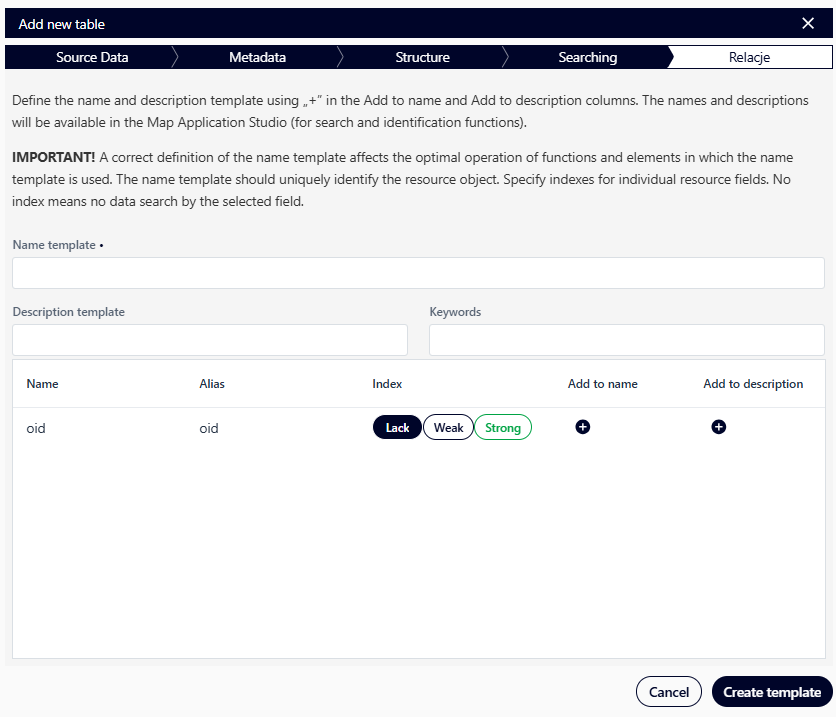
Fig. 41. Adding a new table – Search
The user can, just like when adding a new spatial layer, create relations to the resource or skip this step.
It is possible to create a new table manually from the beginning. To do this, after selecting the “New table” option, choose “Define empty table”, then fill in the required fields in the “Metadata” tab and go to the “Structure” tab. There, you need to add and describe the table fields in the same way as shown in the figure below. New fields are added using the “Add new field” button ().
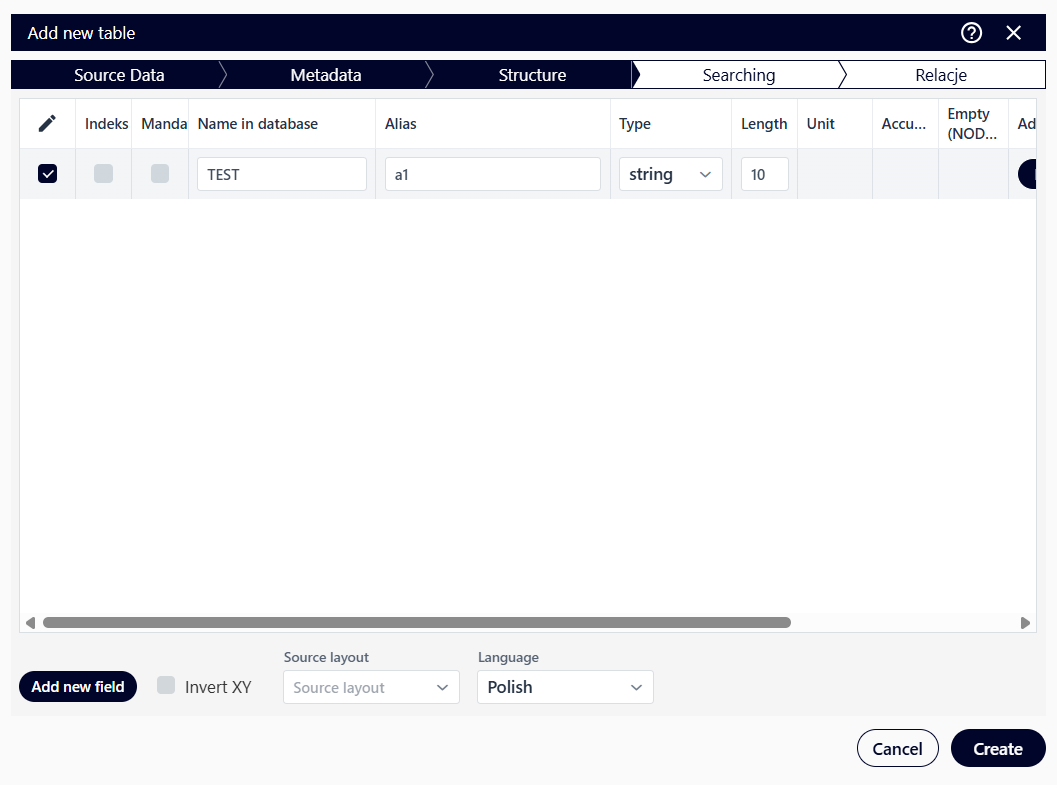
Fig. 42. Adding a new empty table
The user completes the operation by clicking the “Create” button (). The rest of the table creation process is similar to importing a table.
New file
“New File” – this function opens a window for adding a new file.
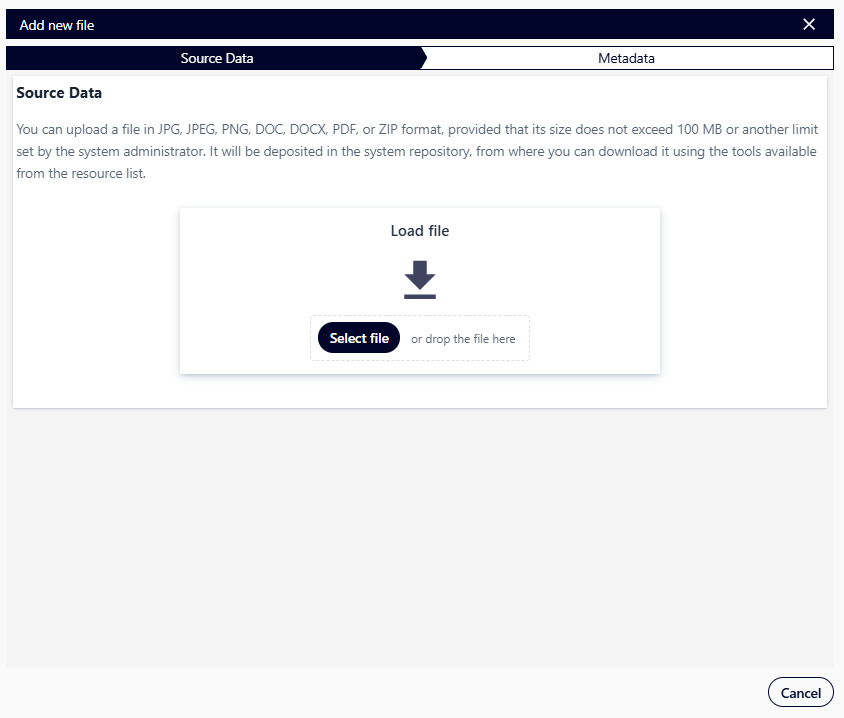
Fig. 43. Adding a new file
The user can upload a file in any format, provided it does not exceed 100 MB. It will be deposited in the system repository, from where it can be downloaded using the tools available in the resource list. Metadata for the resource is defined in the same way as for other resources.
New raster
“New Raster” – this function opens a window for adding a new raster.
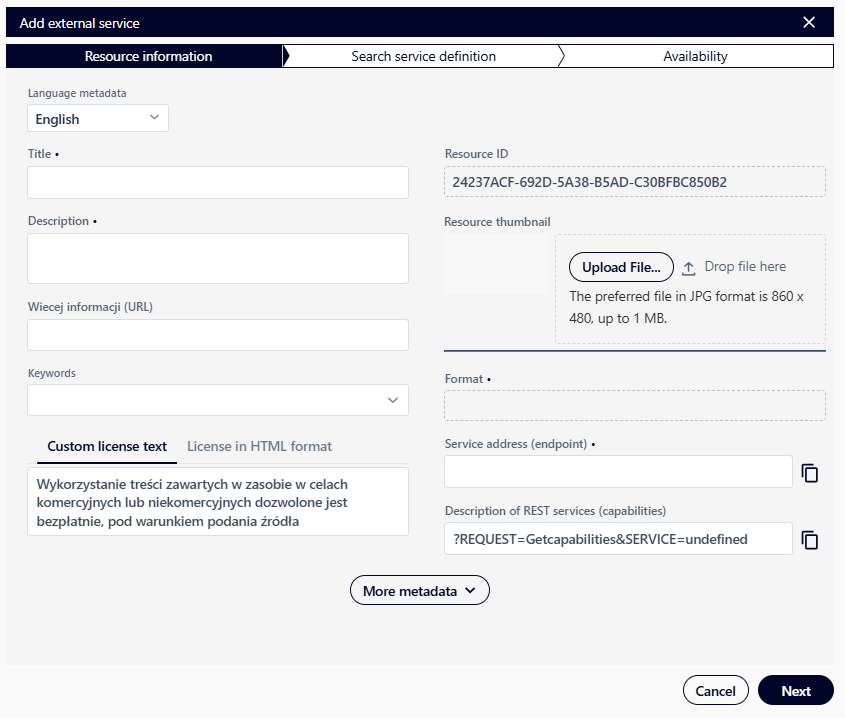
Fig. 44. Adding a new raster
The user can upload a file in any format, provided it does not exceed 100 MB. It will be deposited in the system repository, from where it can be downloaded using the tools available in the resource list. Metadata for the resource is defined in the same way as for other resources.
New algorithm
“New Algorithm” – in the first step, the user uploads a file in the appropriate format. The supported format is XML, generated using SNAP (Sentinel Application Platform), in which the algorithm is stored as a graph.
The uploaded algorithm can be used to define the data processing process in the Task Studio Module.
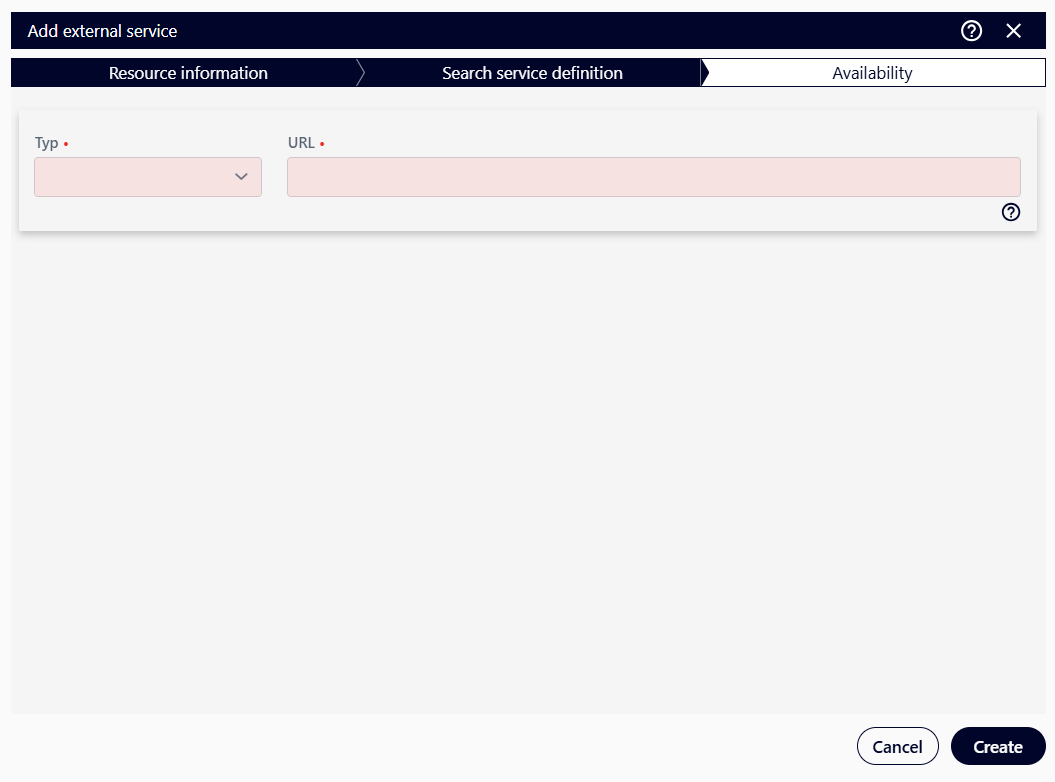
Fig. 45. Adding a new algorithm
The user then defines metadata for the resource – similarly to other resource types.
Adding a new service
After hovering the cursor over the “Service” item, the system displays a list of available items to add.
Fig. 46. Service – resources available to add
New Map Composition
“New Map Composition” – it redirects the user to the Composition Studio Application to configure a new map composition.
Register an external service
“Register external service” - the system opens a window for adding an external service.
The user completes the required fields: “Title”, “Description”, “Service address (endpoint)”, and “Service description (capabilities)”, and then clicks the “Next” button. In the next window, select the desired value from the “Type” list and the “URL” (service address). The operation is completed by clicking the “Create” button ().
Fig. 47. Adding an external service
Fig. 48. Adding an external service
After creating a service, the user can share the resource with other users or request its publication. This can be done with the “Share” button or the “Submit request” button. To share a resource with other users, click “Share” ( ), fill in the required fields, and then confirm by clicking “Share” (
 ). To request a public resource, the user should click “Submit request” (
 ), add a comment, and confirm the action by clicking “Submit request” (
 ).
).
Adding an Analysis
After hovering over “Analyses”, the system displays a list of available items to add.
Fig. 49. Analyses – resources to add
New Complex Analysis
“New Complex Analysis” – this functionality redirects the user to the Analysis Studio Application to configure a new complex analysis.
Adding a project
The Project resource type organizes resources into a folder. The user can add any resources (for example those related thematically), even other projects, to a project.
Hovering over the “Project” item will display a list of available items to add.
Fig. 50. Project – resources to add
“New Project” – this functionality opens the project addition window. In the first window, the user defines metadata for the resource, similarly to other resources. In the next window, the user selects the desired resources to be included in the project with the left mouse button. Selected items are marked in purple. When searching for a specific item, the user can use the “Search” option and various filters: “Resource Type”, “Resource Availability”, and “Keywords”. The operation is completed by clicking the “Create” button ().
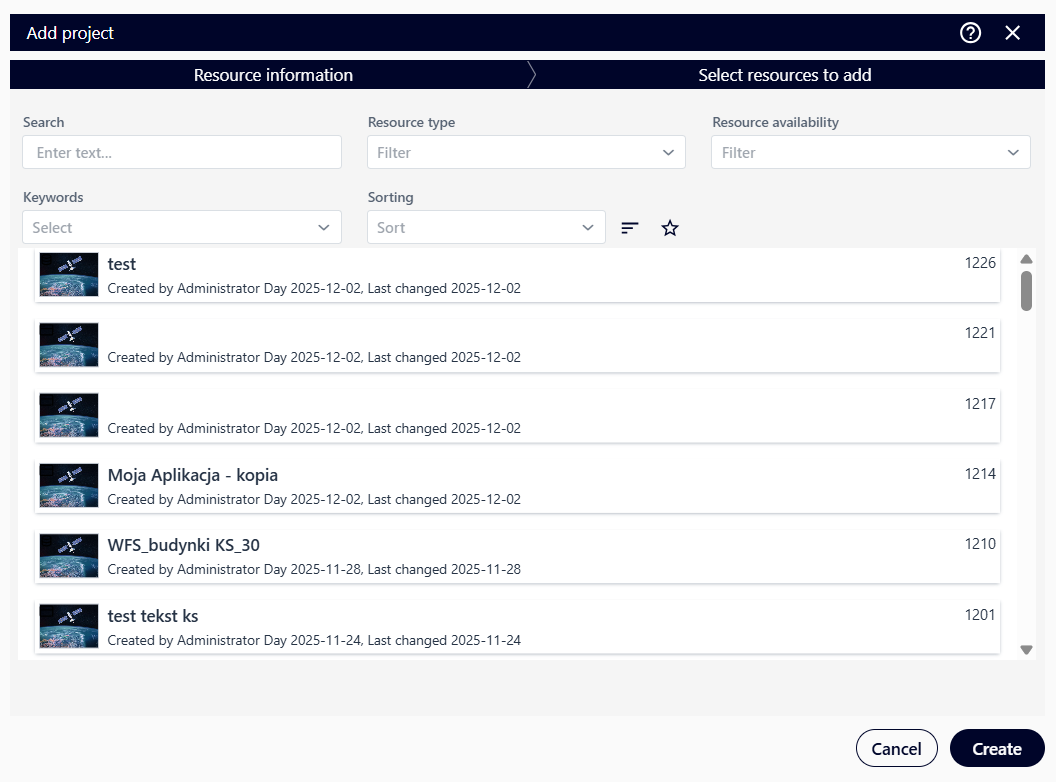
Fig. 51. Adding a new project
To add a resource to a project, the user expands the project menu and selects “Add to”.

Fig. 52. Adding resources to a project
Then, the user filters out the desired resource, marks it, and selects the “Update” button ( ). The number and type of actions available for resources added to the project depend on the resource type. The common action for all resources is “Remove from project”. After opening the project, the user can view the project data and add new resources if they have the appropriate project permissions.
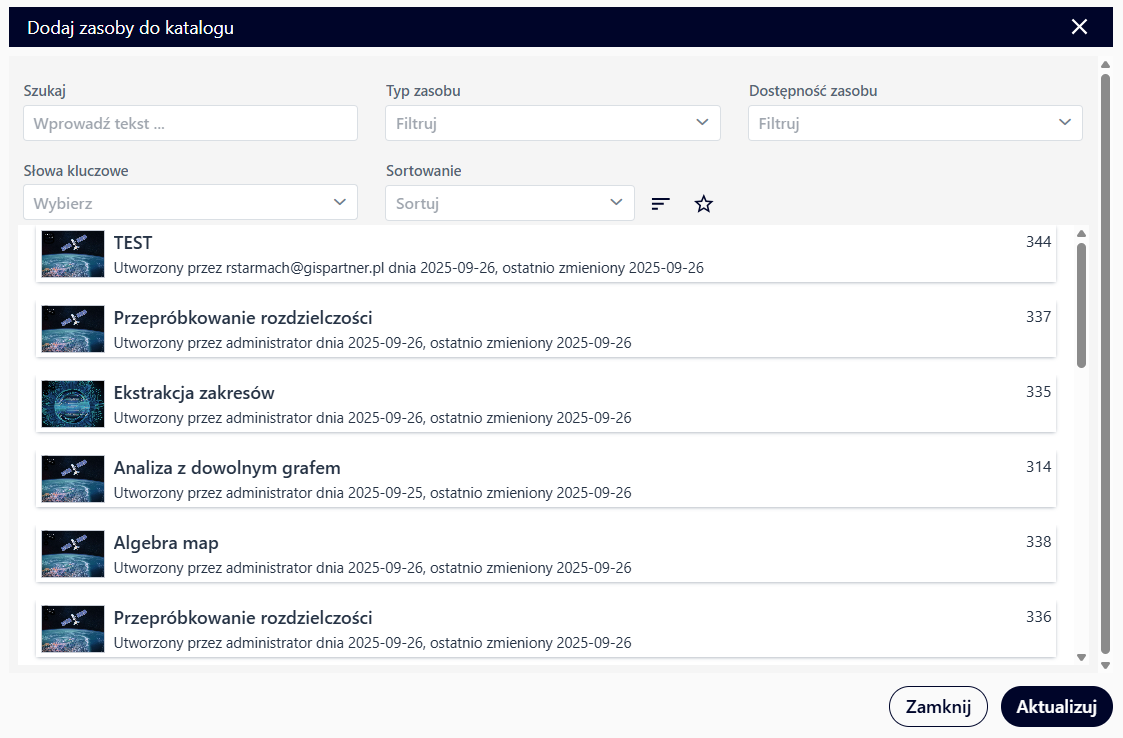
Fig. 53. Updating resources in a project
7. Cloud computing
The functionality redirects the user to the Tenant Manager Application, to the “My Profile” section.

Fig. 54. Cloud computing
8. Granting permissions to your own resource
NSIS Cloud includes features that allow ythe user to grant permissions to a resource to selected teams and users. To grant permissions, the user must be the resource owner and act as an individual. The user hovers over the selected resource to display the menu button, selects the button marked with three vertical dots (), and then selects “Properties”.

Fig. 55. Resource properties
Next, the user selects the “Accessibility” tab. In order to share with other users, the user selects the “Share” button ().
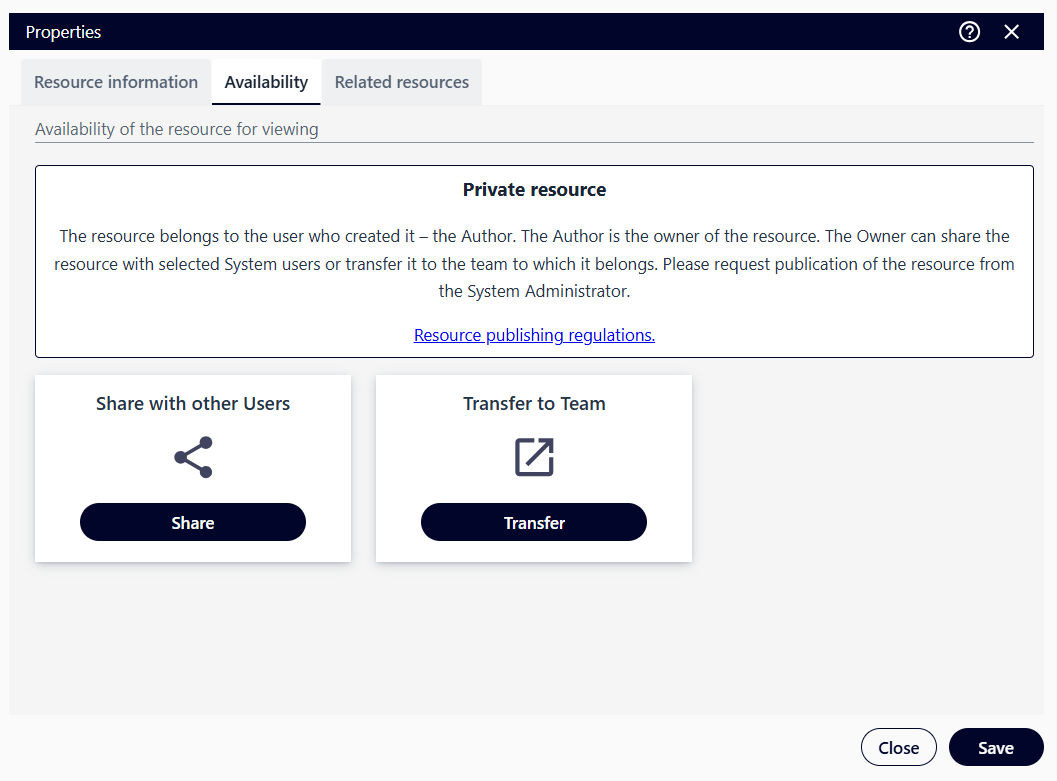
Fig. 56. “Availability” tab
Then, in the “User ID (login)” field, the user enters the login names of the users with whom he/she want to share the selected resource. In the “Team Name” field, the user enters the names of the teams with which they want to share the selected resource. Optionally, they can add a comment.
After left-clicking on the selected team or user, the selected team/user is automatically added to the resource sharing window. After selecting the “Share” button (), the user selects the type of permissions the user wish to grant.
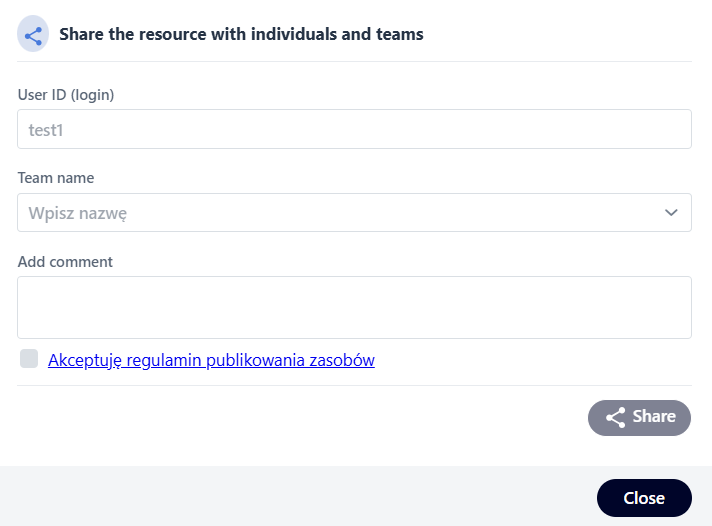
Fig. 57. Sharing a resource
The user assigns permissions to individual Users/Teams.
The application allows the user to define two types of permissions for a resource:
View – displaying the selected resource,
Modify – making changes to the selected resource.
To revoke permissions to a user’s own resource, the user selects the icon ( ) assigned to the team or user from whom they wish to revoke permissions.
9. Transfer of own resources to the team
NSIS Cloud allows the user to transfer a user’s own resource to a team. The user must belong to the team to which resources are transferring the resource.
To transfer a user’s own resource, just as when sharing a resource, open the “Properties” window and then the “Availability” tab. In the next step, select the “Transfer” button ( ).
).
Fig. 58. “Availability” tab
Transferring a resource to the team constitutes a waiver of ownership rights to the selected Resource and the restriction or denial of access to the resource, depending on the permissions assigned by the new owner.
The user retains copyright to the resource transferred to the team. The author is identified in the resource’s metadata. The display name is the user’s alias, which the account holder can change at any time by editing the user profile.
After transferring a resource to a team, the user has the same permissions for the transferred resource as assigned to them within the team (Editor – editing, exporting, updating; Manager – additionally deleting).
The user searches for a team in the “Team to which you want to transfer the resource” field by entering its name or part of its name, or by selecting a team from the list, and then clicking the “Transfer” button ( ).
).
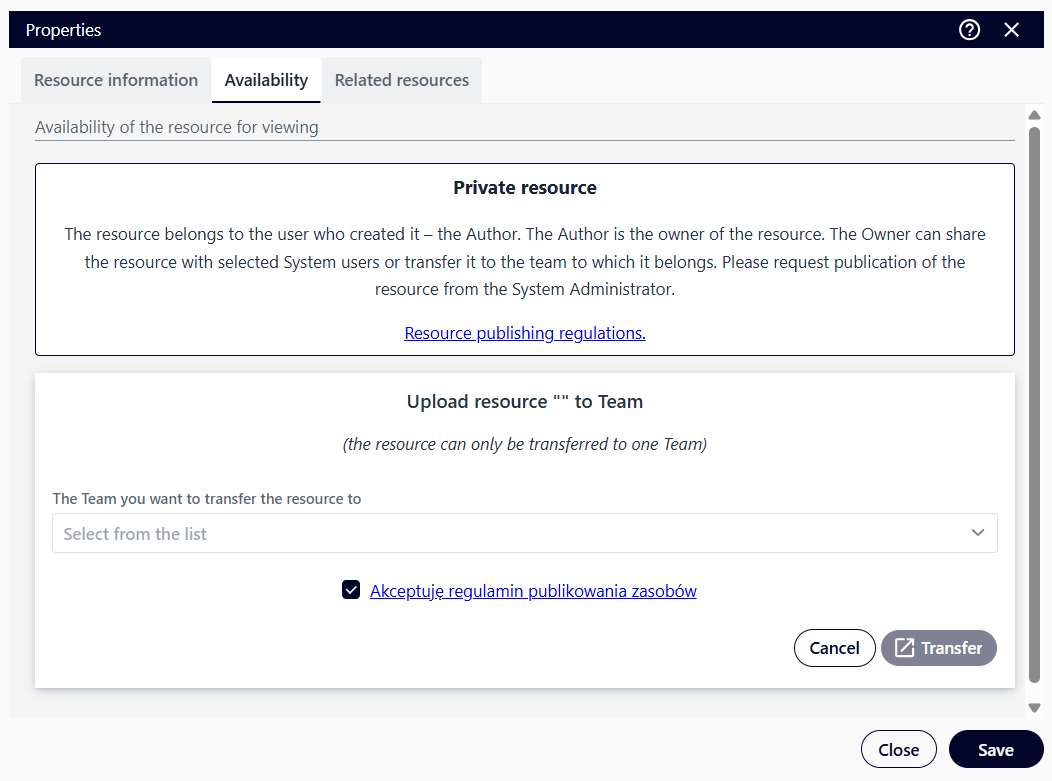
Fig. 59. Transferring a resource
10. Requesting publication of your own resource
NSIS Cloud allows users to request the publication of their own resources.
To submit a request, the user opens the “Properties” window, as when sharing a resource, and then selects the “Accessibility” tab. Next, select the “Submit a Request” button ( ).
).
Fig. 60. “Availability” tab
The User adds a comment to the request and then selects the “Submit a Request” button ().
Publishing a resource by the Administrator transfers the resource to the team, which is equivalent to relinquishing ownership rights to that team and restricting or denying access to the resource, depending on the permissions assigned by the new owner.
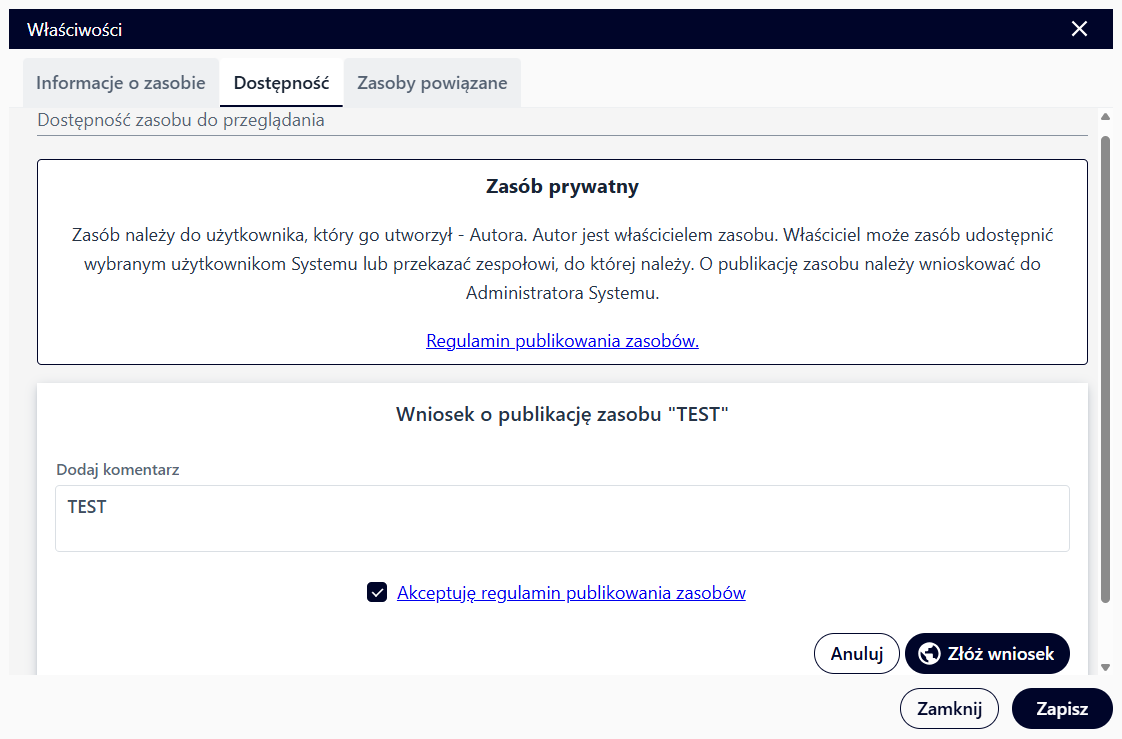
Fig. 61. Submitting an application
11. Team resource availability
NSIS Cloud allows a user with Editor or Team Manager permissions to manage resources within a given team. To do this, switch the user context from Individual to Team. This is possible by clicking the icon in the upper right corner.

Fig. 62. Changing the context
Select “Properties” from the resource menu, then the “Availability” tab. In the selected tab, select User to select “Public Resource”**. This changes the resource’s accessibility from a team resource to a public resource. A public data resource is read-only by default, meaning users can query the data, for example, view data in a map application, or export data. You can extend these permissions to include editing data and attachments by selecting: adding, modifying, and deleting objects, and adding and deleting attachments.
Additionally, for selected resource types, the user can select the “Visibility in the Marketplace” option. Such a resource must have the read option checked to enable the Export from the Services Marketplace option.
The user completes the operation by clicking the “Save” button ( ).
).
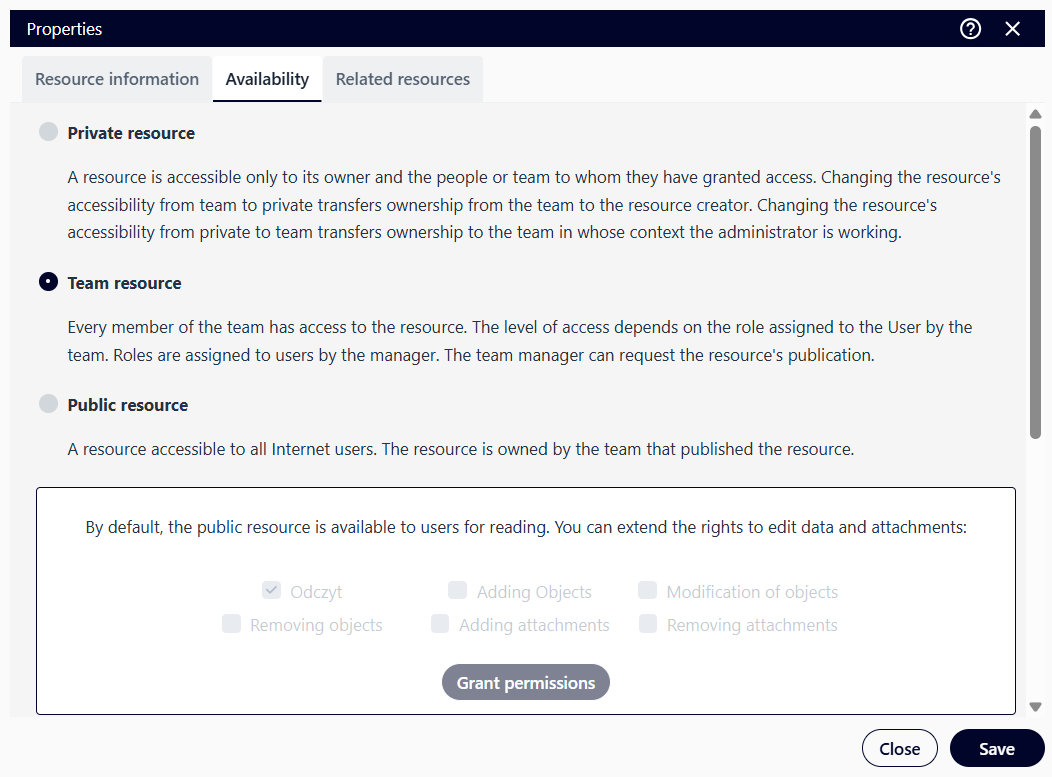
Fig. 63. Publishing a resource
12. User Menu
After selecting the “Show user menu” ( ) icon from the top menu bar, the user menu opens. From this menu, the user can access the “User profile” (
 ) functionality.
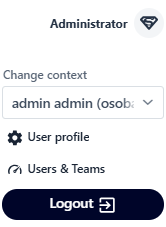
Fig. 64. User Profile button
User profile
The window is divided into three sections:
“Basic User Data” – this section displays current information about the user. It allows users to edit data in Tenant Manager (
 ) and use the “Forget Data” (
 ) option (delete user data from the system).
“Teams” – A list of teams to which the user belongs is displayed, along with assigned roles. The section also contains buttons for joining a team (
 ) and creating a new team (
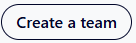 ).
).“Disk Space” – the percentage of available disk space in the Local Archive is displayed. The user can: submit a request to increase the Local Archive storage limit and manage credits if they are an organization administrator in Tenant Manager (
 ).
).
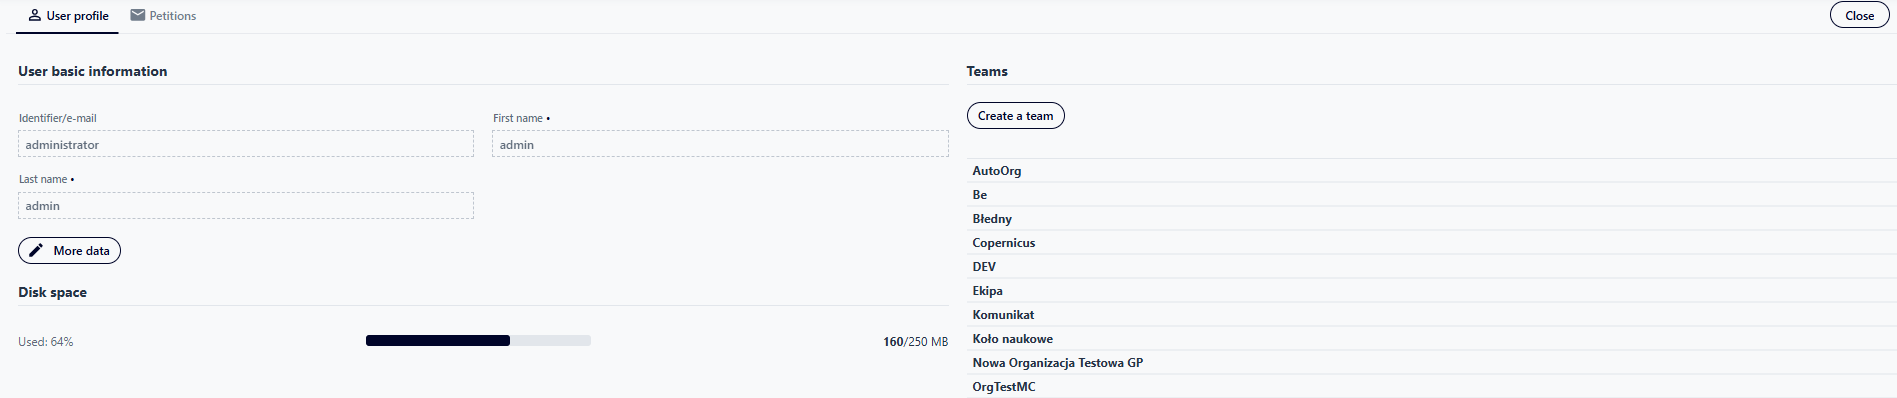
Fig. 65. User Profile tab
Join the team
After selecting the “Join a Team” button (), the user is redirected to the “Applications” ( ) tab, where the application form for joining the team automatically opens.
In the “Join a Team” section, the user selects the desired team from the “Team Name” drop-down list. After selecting the desired team, the system displays basic information about the selected team.
The user then completes the required form fields and approves the application by selecting the “Send Application” button ( ). The application is then sent to the selected team.
The user can be invited to join the team. The invitation will appear in the application list. After opening the invitation, the user can accept the invitation, which will result in joining the team.
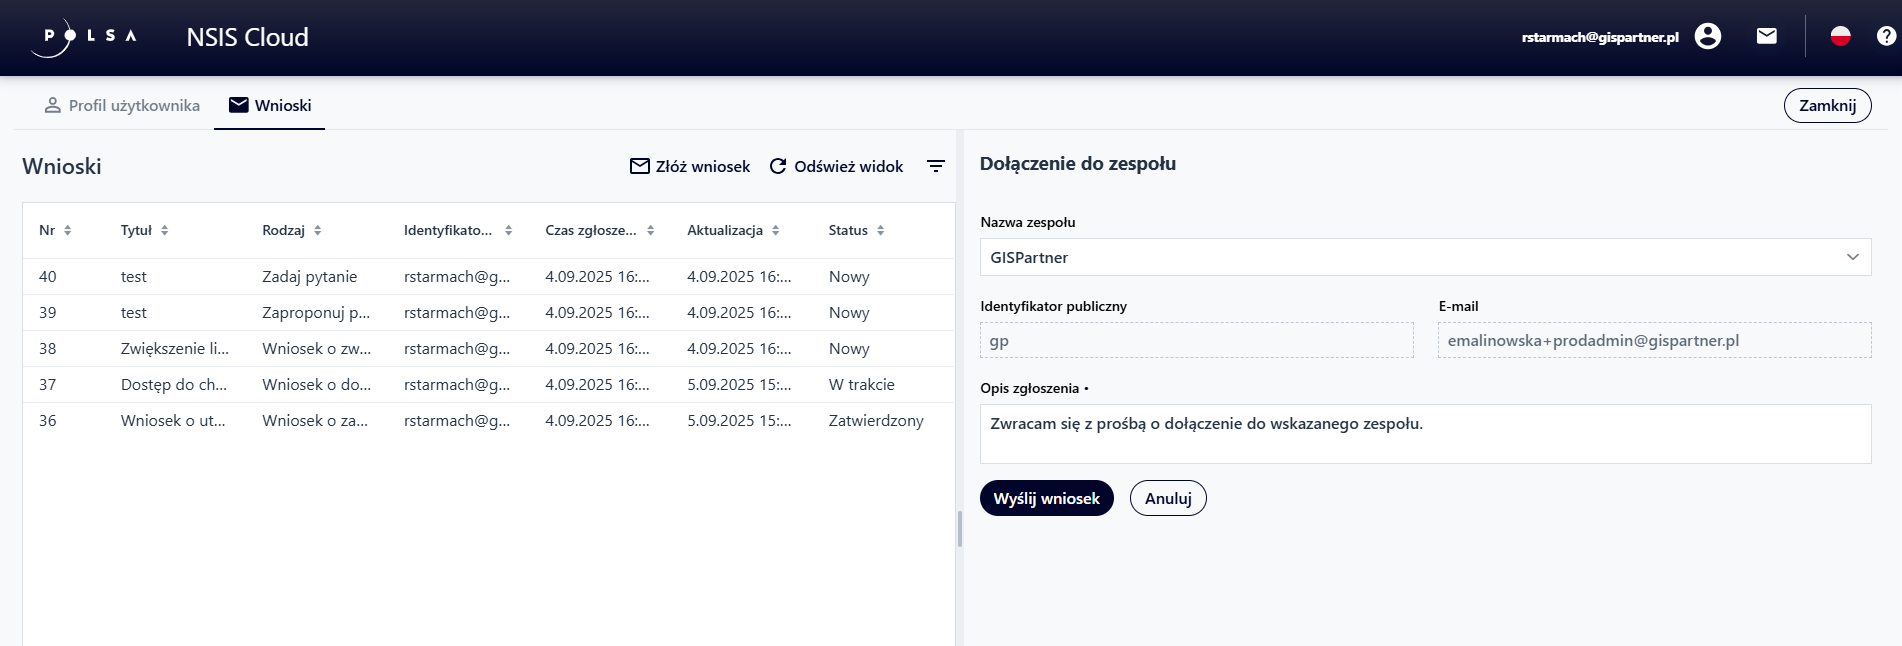
Fig. 66. Joining a team
Create a team
After selecting the “Create a Team” button (), the user is redirected to the “Applications” () tab, where the team creation application form automatically opens.
In the “Create a Team” section, the user enters the required data in the mandatory fields and optionally adds a graphic. After completing the form, the user approves the application by selecting the “Submit Application” button (). Successful submission of the form results in the submission of an application to create a new team.
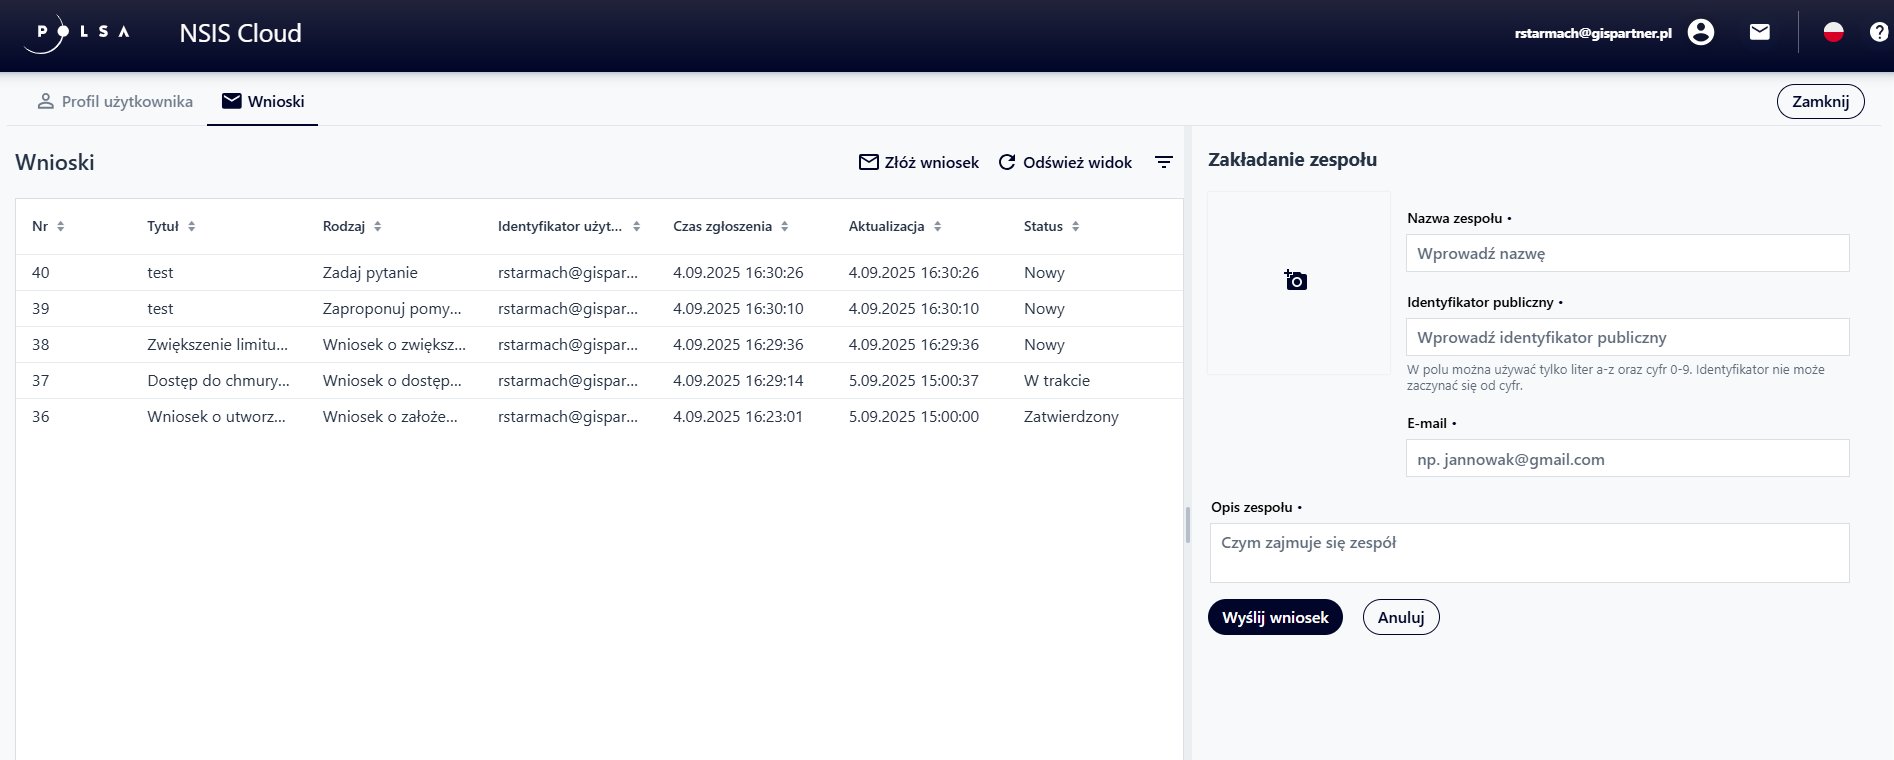
Fig. 67. Create a team
More data
After selecting the “More data” button (), the system opens a new window and redirects the user to the Tenant Manager application, to the “My profile” section, where it is possible to edit the user’s data.
Forget data
Users who do not want their personal data to be processed may request that their data be forgotten in the System. To do so, users select the “Forget data” button (), and the system displays an information message and two options:
“Cancel” (
 ) – aborts the operation and closes the message,
“Forget my data” (
 ) – sends a request to delete the user’s data from the system (exercising the right to be forgotten).
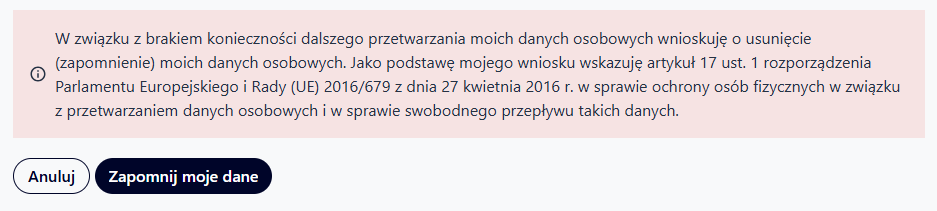
Fig. 68. Forget data
Request a limit increase
The default size limit for all user resources is 100 MB. After selecting the “Request a Limit Increase” button (), the system opens the “Request a Limit Increase” window.
The user enters the desired value in the edit field – the allowed range is 101 to 200,000.
After completing the field, the user confirms the operation by selecting the “Submit a Request” button ().
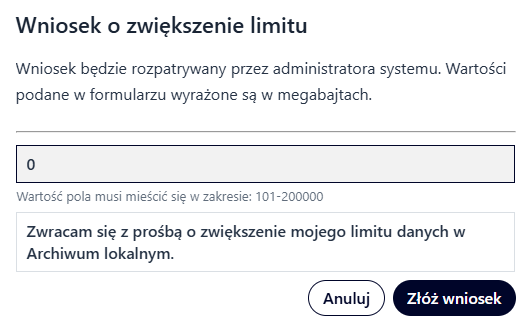
Fig. 69. Request to increase the limit
Manage credits
This button is only visible to users with Administrator roles in the Tenant Manager organization. When an authorized user selects the “Manage Credits” button, the system opens a new window and redirects the user to the Tenant Manager application and the “Contracts / Wallets” section.
Apply
After navigating to the “Applications” () tab, the system displays a list of currently submitted applications along with their current statuses. The user can access the “Applications” view in two ways: by selecting the “Applications” () tab in the user profile, or by directly selecting the “Applications” ( ) icon from the top menu bar.

Fig. 70. Applications tab
This tab contains additional functions that allow the user to:
sort and search for applications in the list using the button (
 )
)refresh the view using the button (
 )
)submit a new application using the “Submit Application” option (
 )
)
After submitting a request, the user can cancel it. To do so, the user selects the request from the list and then clicks the “Cancel” button ( ). This will change the request’s status to “Cancelled”.
After receiving the request, the system Administrator can either accept or reject it. Depending on the decision, the request’s status will change to “Completed” or “Rejected”.
Access to cloud computing
After selecting the “Access to cloud computing” application, the system displays a form for completion, in which the user enters the required data in the mandatory fields and checks the box confirming that they have read the terms and conditions. The process ends by selecting the “Send application” button (). If the user decides to discontinue the process, they select the “Cancel” button ().
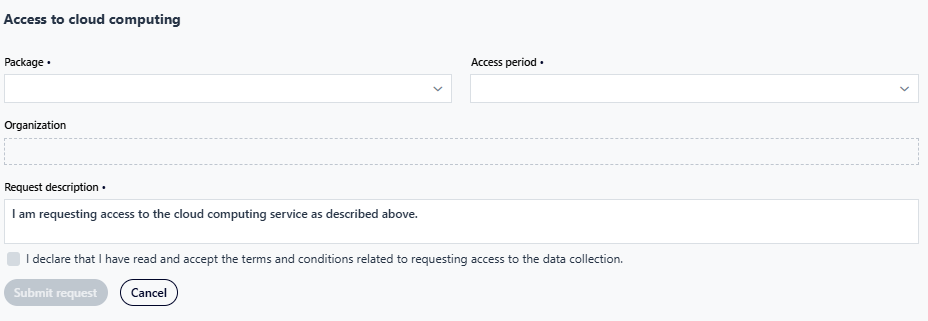
Fig. 71. Access to cloud computing
Increase your cloud computing limit
After selecting the “Increase your cloud computing limit” application, the system displays a form where the user enters the required data in the required fields and checks the box confirming they have read the terms and conditions. The process ends by selecting the “Send application” button (). If the user decides to discontinue the process, they select the “Cancel” button ().
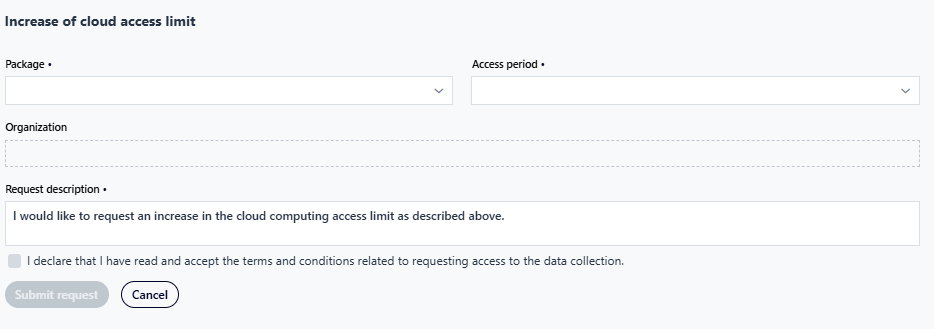
Fig. 72. Increasing the cloud computing limit
Access to additional data collections
After selecting the “Access to additional data collections” application, the system displays a form for completing the application, in which the user selects the desired value from the “Data collection name” drop-down list, completes the “Request description”, and checks the box confirming that they have read the regulations. The process ends by selecting the “Send application” button (). If the user decides to abort the action, the user selects the “Cancel” button ().
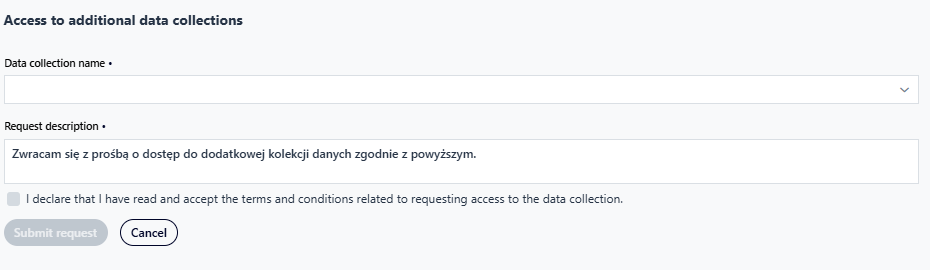
Fig. 73. Access to additional data collections
Increase your data access bandwidth
After selecting the “Increase data access bandwidth” application, the system displays a form for completing it, in which the user selects the desired value from the “Package” drop-down list and completes the “Request description”. The process ends by selecting the “Send application” button (). If the user decides to abort the action, the user select the “Cancel” button ().
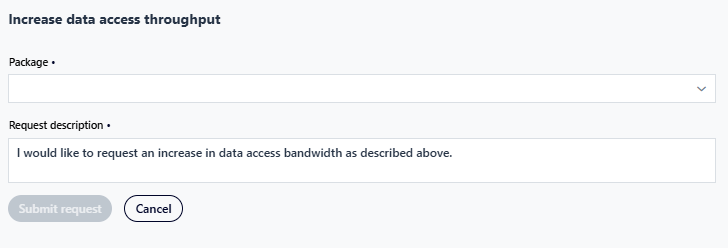
Fig. 74. Increase data access bandwidth
Join the team
Functionality described in the “User profile/Join team” chapter.
Create a team
Functionality described in the “User profile/Create a team” chapter
Increase your Local Archive limit
Functionality described in the “User profile/Request a limit increase”” chapter.
Suggest a change
After selecting the “Suggest a change” request, the system displays a form where the user can submit a proposed change to the system’s operation. To do this, the user completes the “Subject” field and then enter a description of the request. The user can optionally add a graphic. The process ends by selecting the “Send request” button (). If the user decides to abort the action, the user selects the “Cancel” button ().
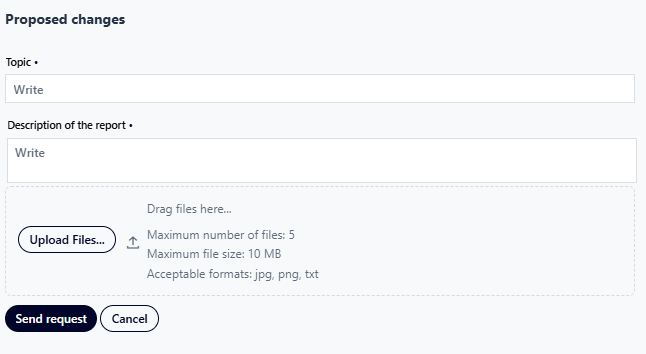
Fig. 75. Suggest a change
Report an error
After selecting the “Report an error” request, the system displays a form where the user can report an error regarding the system’s operation. To do this, they complete the “Subject” field and then enter a description of the request. The user can optionally add a graphic. The process ends by selecting the “Send request” button (). If the user decides to abort the action, the user select the “Cancel” button ().
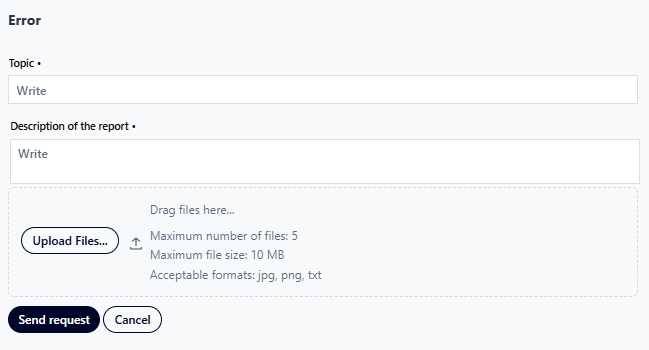
Fig. 76. Report an error
Ask a Question
After selecting the “Ask a Question” request, the system displays a form where the user can submit a query regarding the system’s operation. To do this, the user completes the “Subject” field and then enter a description of the request. The user can optionally add a graphic. The process ends by selecting the “Send Request” button (). If the user decides to abort the action, they select the “Cancel” button ().
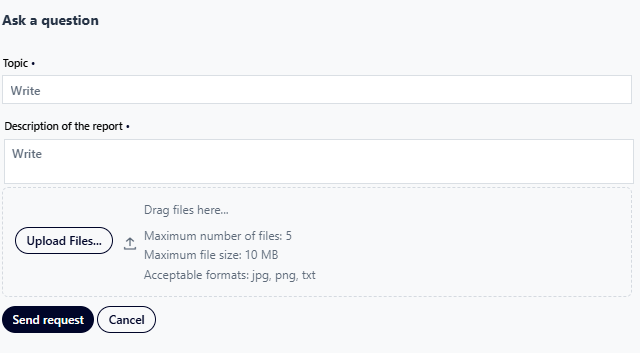
Fig. 77. Ask a question
13. Teams in NSIS Cloud
NSIS Cloud allows the user to manage teams in which the user hold appropriate roles. The Team Manager manages team resources and members. The Team Editor can edit team resources. The Team Observer can view team resources. A Team can only be created by the system administrator or at the request of a user.
By selecting the “Show user menu” icon () from the top menu bar, the user can then expand the “Change context” drop-down list to switch between the physical user profile and the team profile.
Fig. 78. Changing the context
Team management
To manage a team, the Team Manager selects the “Show user menu” icon () from the top menu bar and then, from the “Change context” drop-down list, switches to the context of the desired team in which the Team Manager want to make changes. Then, from the top menu bar, the Team Manager selects the “Show user menu” button ( ) again and then “View profile” (
 ).
).
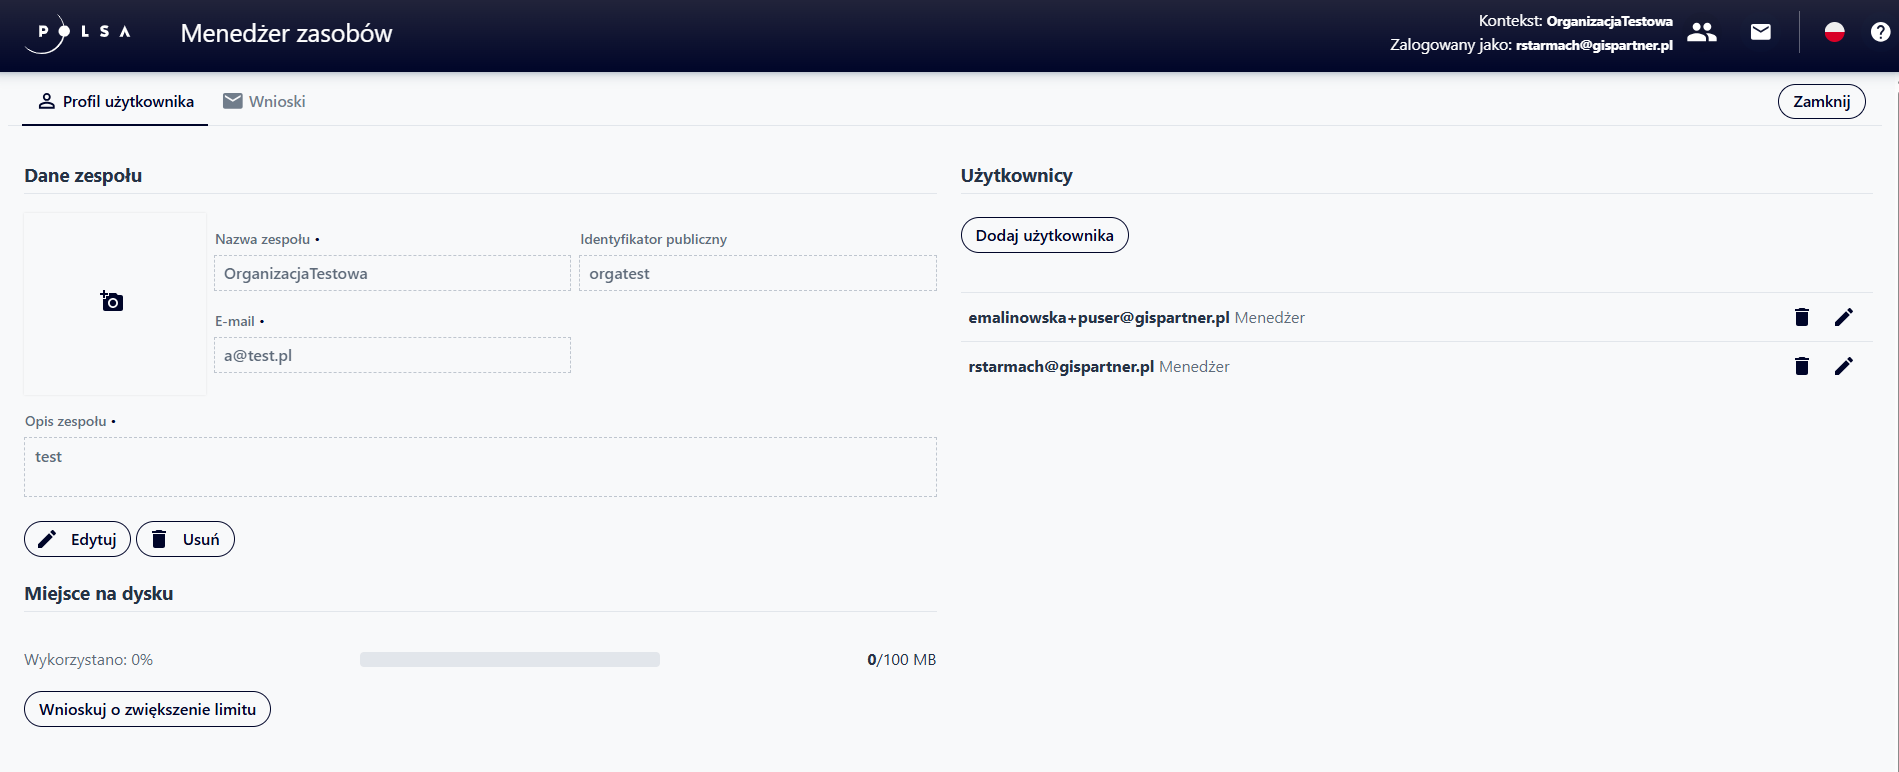
Fig. 79. User profile in the team context
The “User Profile” tab is divided into three sections:
“Team Details” — a section where the Organization Manager with the Administrator role can edit team information (“Edit” button (
 )) or delete the team (“Delete” button (
 )). Deleting a team is only possible if it has no assigned resources or members.
“Users” — a section for managing team members. Using the “Add User” button (
 ), the user can invite a new user to the team. The “Delete” button (
 ) allows the user to remove a user from the team, while “Edit” (
 ) allows the user to change assigned role in the system. The user can define the roles of Observer, Editor, and Manager.
“Disk Space” — a section for submitting a request to increase the disk space limit (“Request to increase limit” button (
 )) and “Credit Management”, which redirects the user to the Tenant Manager application. A detailed description of the functionality can be found in the sections: User Profile / Request a Limit Increase and User Profile / Manage Loans.
Applaying in the context of a team
The “Requests” () tab window is identical to that in the individual context. The only difference is the type of requests that can be submitted. In the organizational context, the user can submit requests:
“Invite to Team” – after selecting the Application, the system opens an Application form for completion. The user enters the email address of the person they wish to invite to the team, then selects their role in the system, and completes the action by submitting the application via the “Send Application” button (
).“Increase Local Archive Limit” – this application is described in the User Profile / Request a Limit Increase chapter.

Fig. 80. Applications in the team context
Access to the same applications is also possible from the “User profile” tab in the “Users” section – “Add user” and “Disk space” – “Request a limit increase”.
14. Changing the Language
Users can change the application interface language. To do this, click the flag icon in the top menu bar ( ). This will display a list of available languages. Selecting the desired language automatically changes the application language.
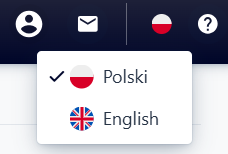
Fig. 81. Changing the language
15. Help
The “Help” function allows you to open the documentation with a detailed description of the available system features. The user can access it by selecting the question mark icon in the top menu bar ( ).
).

Fig. 82. Help
16. Logout
To log out of the system, select the “Show user menu” icon () located on the top menu bar, and then the “Log out” ( ) option.
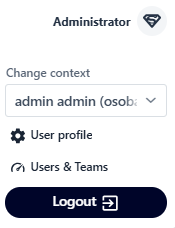
Fig. 83. Log out